手把手教你借助Calcite框架快速实现一个数据库
来源:SegmentFault
2023-02-16 15:30:32
0浏览
收藏
本篇文章给大家分享《手把手教你借助Calcite框架快速实现一个数据库》,覆盖了数据库的常见基础知识,其实一个语言的全部知识点一篇文章是不可能说完的,但希望通过这些问题,让读者对自己的掌握程度有一定的认识(B 数),从而弥补自己的不足,更好的掌握它。
今天教大家借助一款框架快速实现一个数据库,这个框架就是
    org.apache.calcite
    calcite-core

    1.32.0
2. 创建model.json文件和表结构csv
model.json 里面主要描述或者说告诉
{
"version": "1.0",//忽略
"defaultSchema": "CSV",//设置默认的schema
"schemas": [//可定义多个schema
        {
          "name": "CSV",//相当于namespace和上面的defaultSchema的值对应
          "type": "custom",//写死
          "factory": "csv.CsvSchemaFactory",//factory的类名必须是你自己实现的factory的包的全路径
          "operand": { //这里可以传递自定义参数,最终会以map的形式传递给factory的operand参数
          "directory": "csv"//directory代表calcite会在resources下面的csv目录下面读取所有的csv文件,factory创建的Schema会吧这些文件全部构建成Table,可以理解为读取数据文件的根目录,当然key的名称也不一定非得用directory,你可以随意指定
                }
        }
      ]
}
接下来还需要定义一个
public class CsvSchemaFactory implements SchemaFactory {
    /**
     * parentSchema 父节点,一般为root
     * name 为model.json中定义的名字
     * operand 为model.json中定于的数据,这里可以传递自定义参数
     *
     * @param parentSchema Parent schema
     * @param name         Name of this schema
     * @param operand      The "operand" JSON property
     * @return
     */
    @Override
    public Schema create(SchemaPlus parentSchema, String name,
                         Map operand) {
        final String directory = (String) operand.get("directory");
        File directoryFile = new File(directory);
        return new CsvSchema(directoryFile, "scannable");
    }
}
4. 自定义Schma类
有了
//实现这一个方法就行了 @Override protected MapgetTableMap() { if (tableMap == null) { tableMap = createTableMap(); } return tableMap; } private Map createTableMap() { // Look for files in the directory ending in ".csv" final Source baseSource = Sources.of(directoryFile); //会自动过滤掉非指定文件后缀的文件,我这里写的csv File[] files = directoryFile.listFiles((dir, name) -> { final String nameSansGz = trim(name, ".gz"); return nameSansGz.endsWith(".csv"); }); if (files == null) { System.out.println("directory " + directoryFile + " not found"); files = new File[0]; } // Build a map from table name to table; each file becomes a table. final ImmutableMap.Builder builder = ImmutableMap.builder(); for (File file : files) { Source source = Sources.of(file); final Source sourceSansCsv = source.trimOrNull(".csv"); if (sourceSansCsv != null) { final Table table = createTable(source); builder.put(sourceSansCsv.relative(baseSource).path(), table); } } return builder.build(); }
5. 自定义 Table
/**
 * Base class for table that reads CSV files.
 */
public abstract class CsvTable extends AbstractTable {
    protected final Source source;
    protected final @Nullable RelProtoDataType protoRowType;
    private @Nullable RelDataType rowType;
    private @Nullable List fieldTypes;

    /**
     * Creates a CsvTable.
     */
    CsvTable(Source source, @Nullable RelProtoDataType protoRowType) {
        this.source = source;
        this.protoRowType = protoRowType;
    }
        /**
        * 创建一个CsvTable,继承AbstractTable,需要实现里面的getRowType方法,此方法就是获取当前的表结构。
            Table的类型有很多种,比如还有视图类型,AbstractTable类中帮我们默认实现了Table接口的一些方法,比如getJdbcTableType            方法,默认为Table类型,如果有其他定制化需求可直接实现Table接口。
            和AbstractSchema很像
        */
    @Override
    public RelDataType getRowType(RelDataTypeFactory typeFactory) {
        if (protoRowType != null) {
            return protoRowType.apply(typeFactory);
        }
        if (rowType == null) {
            rowType = CsvEnumerator.deduceRowType((JavaTypeFactory) typeFactory, source,
                    null);
        }
        return rowType;
    }

    /**
     * Returns the field types of this CSV table.
     */
    public List getFieldTypes(RelDataTypeFactory typeFactory) {
        if (fieldTypes == null) {
            fieldTypes = new ArrayList();
            CsvEnumerator.deduceRowType((JavaTypeFactory) typeFactory, source,
                    fieldTypes);
        }
        return fieldTypes;
    }

   public static RelDataType deduceRowType(JavaTypeFactory typeFactory,
                                            Source source, @Nullable List fieldTypes) {
        final List types = new ArrayList();
        final List names = new ArrayList();
        try (CSVReader reader = openCsv(source)) {
            String[] strings = reader.readNext();
            if (strings == null) {
                strings = new String[]{"EmptyFileHasNoColumns:boolean"};
            }
            for (String string : strings) {
                final String name;
                final RelDataType fieldType;
                //就是简单的读取字符串冒号前面是名称,冒号后面是类型
                final int colon = string.indexOf(':');
                if (colon >= 0) {
                    name = string.substring(0, colon);
                    String typeString = string.substring(colon + 1);
                    Matcher decimalMatcher = DECIMAL_TYPE_PATTERN.matcher(typeString);
                    if (decimalMatcher.matches()) {
                        int precision = Integer.parseInt(decimalMatcher.group(1));
                        int scale = Integer.parseInt(decimalMatcher.group(2));
                        fieldType = parseDecimalSqlType(typeFactory, precision, scale);
                    } else {
                        switch (typeString) {
                            case "string":
                                fieldType = toNullableRelDataType(typeFactory, SqlTypeName.VARCHAR);
                                break;
                            case "boolean":
                                fieldType = toNullableRelDataType(typeFactory, SqlTypeName.BOOLEAN);
                                break;
                            case "byte":
                                fieldType = toNullableRelDataType(typeFactory, SqlTypeName.TINYINT);
                                break;
                            case "char":
                                fieldType = toNullableRelDataType(typeFactory, SqlTypeName.CHAR);
                                break;
                            case "short":
                                fieldType = toNullableRelDataType(typeFactory, SqlTypeName.SMALLINT);
                                break;
                            case "int":
                                fieldType = toNullableRelDataType(typeFactory, SqlTypeName.INTEGER);
                                break;
                            case "long":
                                fieldType = toNullableRelDataType(typeFactory, SqlTypeName.BIGINT);
                                break;
                            case "float":
                                fieldType = toNullableRelDataType(typeFactory, SqlTypeName.REAL);
                                break;
                            case "double":
                                fieldType = toNullableRelDataType(typeFactory, SqlTypeName.DOUBLE);
                                break;
                            case "date":
                                fieldType = toNullableRelDataType(typeFactory, SqlTypeName.DATE);
                                break;
                            case "timestamp":
                                fieldType = toNullableRelDataType(typeFactory, SqlTypeName.TIMESTAMP);
                                break;
                            case "time":
                                fieldType = toNullableRelDataType(typeFactory, SqlTypeName.TIME);
                                break;
                            default:
                                LOGGER.warn(
                                        "Found unknown type: {} in file: {} for column: {}. Will assume the type of "
                                                + "column is string.",
                                        typeString, source.path(), name);
                                fieldType = toNullableRelDataType(typeFactory, SqlTypeName.VARCHAR);
                                break;
                        }
                    }
                } else {
                    //  如果没定义,默认都是String类型,字段名称也是string
                    name = string;
                    fieldType = typeFactory.createSqlType(SqlTypeName.VARCHAR);
                }
                names.add(name);
                types.add(fieldType);
                if (fieldTypes != null) {
                    fieldTypes.add(fieldType);
                }
            }
        } catch (IOException e) {
            // ignore
        }
        if (names.isEmpty()) {
            names.add("line");
            types.add(typeFactory.createSqlType(SqlTypeName.VARCHAR));
        }
        return typeFactory.createStructType(Pair.zip(names, types));
    }
}
获取文件中的数据,上面把
@Override public Enumerable
生成临时的
model.json
,之前是基于文件,现在基于text
字符串,mode=inline
模式设置我的表结构、表名称、字段名、字段类型等,并放置在内存中,同时将适配器查询出来的数据也放进去
table
里面获取连接,执行查询,完美!
上述
{
  "version": "1.0",
  "defaultSchema": "Demo",
  "schemas": [
    {
      "name": "Demo",
      "type": "custom",
    //  这里是calcite默认的SchemaFactory,里面的流程和我们上述自己定义的相同,下面会简单看看源码。
      "factory": "org.apache.calcite.adapter.jdbc.JdbcSchema$Factory",
      "operand": {
        //  我用的是mysql8以上版本,所以这里注意包的名称
        "jdbcDriver": "com.mysql.cj.jdbc.Driver",
        "jdbcUrl": "jdbc:mysql://localhost:3306/irving",
        "jdbcUser": "root",
        "jdbcPassword": "123456"
      }
    }
  ]
}
mysql mysql-connector-java 8.0.30 public class TestMysql { public static void main(String[] args) throws SQLException { Connection connection = null; Statement statement = null; try { Properties info = new Properties(); info.put("model", Sources.of(TestMysql.class.getResource("/mysqlmodel.json")).file().getAbsolutePath()); connection = DriverManager.getConnection("jdbc:calcite:", info); statement = connection.createStatement(); statement.executeUpdate(" insert into userinfo1 values ('xxx',12) "); print(statement.executeQuery("select * from asset ")); print(statement.executeQuery(" select * from userinfo1 ")); print(statement.executeQuery(" select age from userinfo1 where name ='aixiaoxian' ")); print(statement.executeQuery(" select * from userinfo1 where age >60 ")); print(statement.executeQuery(" select * from userinfo1 where name like 'a%' ")); } finally { connection.close(); } } private static void print(ResultSet resultSet) throws SQLException { final ResultSetMetaData metaData = resultSet.getMetaData(); final int columnCount = metaData.getColumnCount(); while (resultSet.next()) { for (int i = 1; ; i++) { System.out.print(resultSet.getString(i)); if (i查询结果:
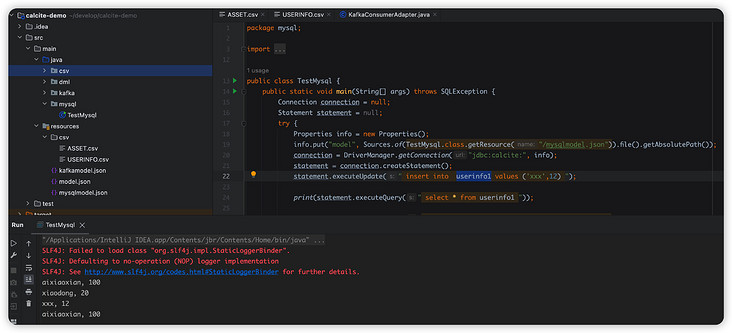
Mysql实现原理
上述我们在
public static JdbcSchema create( SchemaPlus parentSchema, String name, Map
operand) { DataSource dataSource; try { final String dataSourceName = (String) operand.get("dataSource"); if (dataSourceName != null) { dataSource = AvaticaUtils.instantiatePlugin(DataSource.class, dataSourceName); } else { //会走在这里来,这里就是我们在model.json中指定的jdbc的连接信息,最终会创建一个datasource final String jdbcUrl = (String) requireNonNull(operand.get("jdbcUrl"), "jdbcUrl"); final String jdbcDriver = (String) operand.get("jdbcDriver"); final String jdbcUser = (String) operand.get("jdbcUser"); final String jdbcPassword = (String) operand.get("jdbcPassword"); dataSource = dataSource(jdbcUrl, jdbcDriver, jdbcUser, jdbcPassword); } } catch (Exception e) { throw new RuntimeException("Error while reading dataSource", e); } String jdbcCatalog = (String) operand.get("jdbcCatalog"); String jdbcSchema = (String) operand.get("jdbcSchema"); String sqlDialectFactory = (String) operand.get("sqlDialectFactory"); if (sqlDialectFactory == null || sqlDialectFactory.isEmpty()) { return JdbcSchema.create( parentSchema, name, dataSource, jdbcCatalog, jdbcSchema); } else { SqlDialectFactory factory = AvaticaUtils.instantiatePlugin( SqlDialectFactory.class, sqlDialectFactory); return JdbcSchema.create( parentSchema, name, dataSource, factory, jdbcCatalog, jdbcSchema); } } @Override public @Nullable Table getTable(String name) { return getTableMap(false).get(name); } private synchronized ImmutableMap getTableMap( boolean force) { if (force || tableMap == null) { tableMap = computeTables(); } return tableMap; } private ImmutableMap computeTables() { Connection connection = null; ResultSet resultSet = null; try { connection = dataSource.getConnection(); final Pair catalogSchema = getCatalogSchema(connection); final String catalog = catalogSchema.left; final String schema = catalogSchema.right; final Iterable tableDefs; Foo threadMetadata = THREAD_METADATA.get(); if (threadMetadata != null) { tableDefs = threadMetadata.apply(catalog, schema); } else { final List tableDefList = new ArrayList(); // 获取元数据 final DatabaseMetaData metaData = connection.getMetaData(); resultSet = metaData.getTables(catalog, schema, null, null); while (resultSet.next()) { //获取库名,表明等信息 final String catalogName = resultSet.getString(1); final String schemaName = resultSet.getString(2); final String tableName = resultSet.getString(3); final String tableTypeName = resultSet.getString(4); tableDefList.add( new MetaImpl.MetaTable(catalogName, schemaName, tableName, tableTypeName)); } tableDefs = tableDefList; } final ImmutableMap.Builder builder = ImmutableMap.builder(); for (MetaImpl.MetaTable tableDef : tableDefs) { final String tableTypeName2 = tableDef.tableType == null ? null : tableDef.tableType.toUpperCase(Locale.ROOT).replace(' ', '_'); final TableType tableType = Util.enumVal(TableType.OTHER, tableTypeName2); if (tableType == TableType.OTHER && tableTypeName2 != null) { System.out.println("Unknown table type: " + tableTypeName2); } // 最终封装成JdbcTable对象 final JdbcTable table = new JdbcTable(this, tableDef.tableCat, tableDef.tableSchem, tableDef.tableName, tableType); builder.put(tableDef.tableName, table); } return builder.build(); } catch (SQLException e) { throw new RuntimeException( "Exception while reading tables", e); } finally { close(connection, null, resultSet); } } SQL执行流程
OK,到这里基本上两个简单的案例已经演示好了,最后补充一下整个
public class KafkaConsumerAdapter { public static Listexecutor(KafkaSqlInfo kafkaSql) { Properties props = new Properties(); props.put(CommonClientConfigs.BOOTSTRAP_SERVERS_CONFIG, kafkaSql.getSeeds()); props.put(ConsumerConfig.KEY_DESERIALIZER_CLASS_CONFIG, StringDeserializer.class.getCanonicalName()); props.put(ConsumerConfig.VALUE_DESERIALIZER_CLASS_CONFIG, StringDeserializer.class.getCanonicalName()); props.put(ConsumerConfig.AUTO_OFFSET_RESET_CONFIG, "earliest"); KafkaConsumer consumer = new KafkaConsumer(props); List topics = new ArrayList(); for (Integer partition : kafkaSql.getPartition()) { TopicPartition tp = new TopicPartition(kafkaSql.getTableName(), partition); topics.add(tp); } consumer.assign(topics); for (TopicPartition tp : topics) { Map offsets = consumer.endOffsets(Collections.singleton(tp)); long position = 500; if (offsets.get(tp).longValue() > position) { consumer.seek(tp, offsets.get(tp).longValue() - 500); } else { consumer.seek(tp, 0); } } List results = new ArrayList(); boolean flag = true; while (flag) { ConsumerRecords records = consumer.poll(Duration.ofMillis(100)); for (ConsumerRecord record : records) { //转成我定义的对象集合 KafkaResult result = new KafkaResult(); result.setPartition(record.partition()); result.setOffset(record.offset()); result.setMsg(record.value()); result.setKey(record.key()); results.add(result); } if (!records.isEmpty()) { flag = false; } } consumer.close(); return results; } } public class TestKafka { public static void main(String[] args) throws Exception { KafkaService kafkaService = new KafkaService(); //把解析到的参数放在我自己定义的kafkaSqlInfo对象中 KafkaSqlInfo sqlInfo = kafkaService.parseSql("select * from `cmdb-calltopo` where `partition` in (0,1,2) limit 1000 "); //适配器获取数据源,主要是从上述的sqlInfo对象中去poll数据 Listresults = KafkaConsumerAdapter.executor(sqlInfo); //执行查询 query(sqlInfo.getTableName(), results, sqlInfo.getSql()); sqlInfo = kafkaService.parseSql("select * from `cmdb-calltopo` where `partition` in (0,1,2) AND msg like '%account%' limit 1000 "); results = KafkaConsumerAdapter.executor(sqlInfo); query(sqlInfo.getTableName(), results, sqlInfo.getSql()); sqlInfo = kafkaService.parseSql("select count(*) AS addad from `cmdb-calltopo` where `partition` in (0,1,2) limit 1000 "); results = KafkaConsumerAdapter.executor(sqlInfo); query(sqlInfo.getTableName(), results, sqlInfo.getSql()); } private static void query(String tableName, List results, String sql) throws Exception { //创建model.json,设置我的SchemaFactory,设置库名 String model = createTempJson(); //设置我的表结构,表名称和表字段名以及类型 KafkaTableSchema.generateSchema(tableName, results); Properties info = new Properties(); info.setProperty("lex", Lex.JAVA.toString()); Connection connection = DriverManager.getConnection(Driver.CONNECT_STRING_PREFIX + "model=inline:" + model, info); Statement st = connection.createStatement(); //执行 ResultSet result = st.executeQuery(sql); ResultSetMetaData rsmd = result.getMetaData(); List 执行查询,就可以得到我们想要的效果了。
写好测试类,这样直接就相当于完成了所有的功能了。
在项目中引入 Mysql 的驱动包
CREATE TABLE `USERINFO1` (
  `NAME` varchar(255) CHARACTER SET utf8mb3 COLLATE utf8_general_ci DEFAULT NULL,
  `AGE` int DEFAULT NULL
) ENGINE=InnoDB DEFAULT CHARSET=utf8mb3;

CREATE TABLE `ASSET` (
  `NAME` varchar(255) CHARACTER SET utf8mb3 COLLATE utf8_general_ci DEFAULT NULL,
  `MONEY` varchar(255) CHARACTER SET utf8mb3 COLLATE utf8_general_ci DEFAULT NULL
) ENGINE=InnoDB DEFAULT CHARSET=utf8mb3;
版本声明
本文转载于:SegmentFault 如有侵犯,请联系study_golang@163.com删除
 浅析MySQL中导致查询慢的原因有哪些
- 上一篇
- 浅析MySQL中导致查询慢的原因有哪些

- 下一篇
- 全网都在说一个错误的结论
评论列表
-

- 洁净的小白菜
- 感谢大佬分享,一直没懂这个问题,但其实工作中常常有遇到...不过今天到这,帮助很大,总算是懂了,感谢作者分享博文!
- 2023-03-30 22:02:43
-
- 无辜的香水
- 这篇文章内容太及时了,好细啊,真优秀,mark,关注作者了!希望作者能多写数据库相关的文章。
- 2023-03-19 18:52:27
查看更多
最新文章
-

- 数据库 · MySQL | 16小时前 | MySQL · JSON · 索引 · 数据库 · 查询优化 · 生成列 · json_extract 索引优化 列表筛选 生成列 MySQL JSON JSON索引
- MySQL JSON 字段怎么给列表筛选提速:生成列、索引与 NULL 边界
- 351浏览 收藏
-

- 数据库 · MySQL | 5天前 | 并发 · MySQL · InnoDB · update · 库存扣减 · innodb MySQL 库存扣减 条件 UPDATE 防超卖 affected rows
- MySQL 库存怎么安全扣减?条件 UPDATE、防超卖和受影响行判断
- 470浏览 收藏


查看更多
课程推荐
-

- 前端进阶之JavaScript设计模式
- 设计模式是开发人员在软件开发过程中面临一般问题时的解决方案,代表了最佳的实践。本课程的主打内容包括JS常见设计模式以及具体应用场景,打造一站式知识长龙服务,适合有JS基础的同学学习。
- 543次学习
-

- GO语言核心编程课程
- 本课程采用真实案例,全面具体可落地,从理论到实践,一步一步将GO核心编程技术、编程思想、底层实现融会贯通,使学习者贴近时代脉搏,做IT互联网时代的弄潮儿。
- 516次学习
-

- 简单聊聊mysql8与网络通信
- 如有问题加微信:Le-studyg;在课程中,我们将首先介绍MySQL8的新特性,包括性能优化、安全增强、新数据类型等,帮助学生快速熟悉MySQL8的最新功能。接着,我们将深入解析MySQL的网络通信机制,包括协议、连接管理、数据传输等,让
- 500次学习
-
- JavaScript正则表达式基础与实战
- 在任何一门编程语言中,正则表达式,都是一项重要的知识,它提供了高效的字符串匹配与捕获机制,可以极大的简化程序设计。
- 487次学习
-

- 从零制作响应式网站—Grid布局
- 本系列教程将展示从零制作一个假想的网络科技公司官网,分为导航,轮播,关于我们,成功案例,服务流程,团队介绍,数据部分,公司动态,底部信息等内容区块。网站整体采用CSSGrid布局,支持响应式,有流畅过渡和展现动画。
- 485次学习
查看更多
AI推荐
-

- ljg-skills
- ljg-skills 是李继刚开源的 AI 技能与提示词集合,面向大模型使用者整理了一批可复用的 prompt、角色设定和任务技能模板,适合用于学习提示词设计、搭建个人 AI 工作流和沉淀团队常用智能体能力。
- 4609次使用
-

- MELO音乐
- MELO音乐是一站式AI视频与音乐制作助手,对标suno, udio的高品质体验。提供伴奏生成、原创写词、无损导出、哼唱识曲、混音变声等全套音频与短视频编辑工具。无论是流行Kpop、电音说唱、民谣古风、摇滚儿歌还是商用轻音乐,MELO为你免费谱曲,轻松做同款!
- 4240次使用
-

- UniScribe
- UniScribe 是一款 AI 音视频转文字与内容整理工具,支持上传音频、视频文件或粘贴 YouTube 链接,自动生成转写文本、摘要、思维导图和关键问题,并支持多格式导出,适合会议记录、课程学习、访谈整理和内容创作复盘。
- 4197次使用
-

- 剧云
- 剧云是专业中文剧本创作平台,安全稳定运行十余年,集成AI编剧、剧本医生审核、人物小传、剧情关系图、大纲编写、多人协作、Word导入导出、版权管控功能,数据安全防护,轻松高效创作剧本。
- 4421次使用
-

- 万象有声
- 万象有声,一个专为有声创作者打造的新一代智能有声内容创作平台。平台提供专业的智能拆章、智能画本编辑、AI配音、AI生成音效、后期制作、智能对轨、智能审听等有声创作全流程工具,可以帮助创作者高效、低成本创作出引人入胜的有声作品。立即体验,让有声书制作更简单!
- 4377次使用
查看更多
相关文章
-
- MySQL 明明加了索引,为什么查询还是很慢?先查这 6 个点
- 2026-06-27 374浏览
-
- 接口返回的数据和数据库不一致怎么办?按数据生命周期排查
- 2026-06-27 398浏览
-
- golang MySQL实现对数据库表存储获取操作示例
- 2022-12-22 499浏览
-
- golang 基于 mysql 简单实现分布式读写锁
- 2023-01-07 384浏览
-
- 详解如何利用GORM实现MySQL事务
- 2023-01-07 184浏览