go smtp实现邮件发送示例详解
来源:脚本之家
2022-12-30 16:19:24
0浏览
收藏
在Golang实战开发的过程中,我们经常会遇到一些这样那样的问题,然后要卡好半天,等问题解决了才发现原来一些细节知识点还是没有掌握好。今天golang学习网就整理分享《go smtp实现邮件发送示例详解》,聊聊gosmtp、邮件发送,希望可以帮助到正在努力赚钱的你。
smtp指令
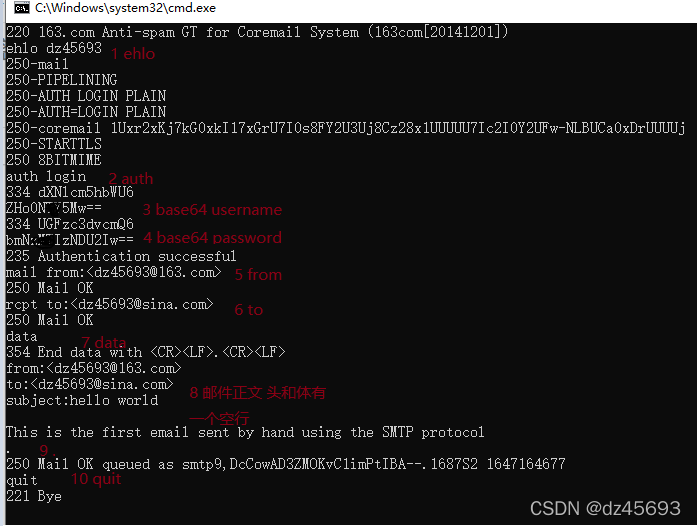
书接上文邮件实现详解,这里我们及我们简单复习一下smtp的指令如下:
telnet smtp.163.com 25 [outpout] ehlo dz45693 [outpout] auth login [outpout] 输入用户名base64 [outpout] 输入密码base64 mail from:[outpout] rcpt to: [outpout] data [outpout] from: to: subject:hello world This is the first email sent by hand using the SMTP protocol quit
go demo
好,那我们下现在用go实现代码让如下:这里只是一个demo,主要熟悉smtp命令
package main
import (
	"bufio"
	"encoding/base64"
	"fmt"
	"net"
	"strconv"
	"strings"
)
func main() {
	testSmtp()
}
var gConn net.Conn
var gRead *bufio.Reader
var gWrite *bufio.Writer
//可以放到这样的类里
type TcpClient struct {
	Conn  net.Conn
	Read  *bufio.Reader
	Write *bufio.Writer
} //
func Connect(host string, port int) (net.Conn, *bufio.Reader, *bufio.Writer) {
	addr := host + ":" + strconv.Itoa(port)
	conn, err := net.Dial("tcp", addr)
	if err != nil {
		return nil, nil, nil
	}
	reader := bufio.NewReader(conn)
	writer := bufio.NewWriter(conn)
	return conn, reader, writer
} //
//收取一行,可再优化
func RecvLine() string {
	line, err := gRead.ReadString('\n') //如何设定超时?
	if err != nil {
		fmt.Print(err)
		return ""
	}
	line = strings.Split(line, "\r")[0] //还要再去掉 "\r",其实不去掉也可以
	return line
}
func SendLine(line string) {
	gWrite.WriteString(line + "\r\n")
	gWrite.Flush()
}
//解码一行命令,这里比较简单就是按空格进行分隔就行了
func DecodeCmd(line string, sp string) []string {
	tmp := strings.Split(line, sp)
	var cmds = []string{"", "", "", "", ""} //先定义多几个,以面后面使用时产生异常
	for i := 0; i = len(cmds) {
			break
		}
		cmds[i] = tmp[i]
	}
	return cmds
}
//读取多行结果
func RecvMCmd() string {
	i := 0
	rs := ""
	mLine := ""
	for i = 0; i
	//收取多行
	line = RecvMCmd()
	fmt.Println("recv:" + line)
	//--------------------------------------------------
	//用 base64 登录
	SendLine("AUTH LOGIN")
	//收取一行
	line = RecvLine()
	fmt.Println("recv:" + line)
	s := "dz45693" //要换成你的用户名,注意 163 邮箱的话不要带后面的 @域名 部分
	s = base64.StdEncoding.EncodeToString([]byte(s))
	SendLine(s)
	//收取一行
	line = RecvLine()
	fmt.Println("recv:" + line)
	s = "xxxxx" //要换成您的密码
	s = base64.StdEncoding.EncodeToString([]byte(s))
	SendLine(s)
	//收取一行
	line = RecvLine()
	fmt.Println("recv:" + line)
	//--------------------------------------------------
	//邮件内容
	from := "dz45693@163.com"
	to := "dz45693@sina.com"
	SendLine("MAIL FROM: ") //注意"")
	//收取一行
	line = RecvLine()
	fmt.Println("recv:" + line)
	SendLine("DATA")
	//收取一行
	line = RecvLine()
	fmt.Println("recv:" + line)
//发送邮件头
	SendLine("from:")
	SendLine("to:")
	SendLine("subject:hello world")
	SendLine("") //发送空行 后面就是邮件体
	SendLine("This is the first email sent by hand using the SMTP protocol")
	SendLine(".") //邮件结束符
	//收取一行
	line = RecvLine()
	fmt.Println("recv:" + line)
	SendLine("quit") //链接推出
	line = RecvLine()
	fmt.Println("recv:" + line)
} //
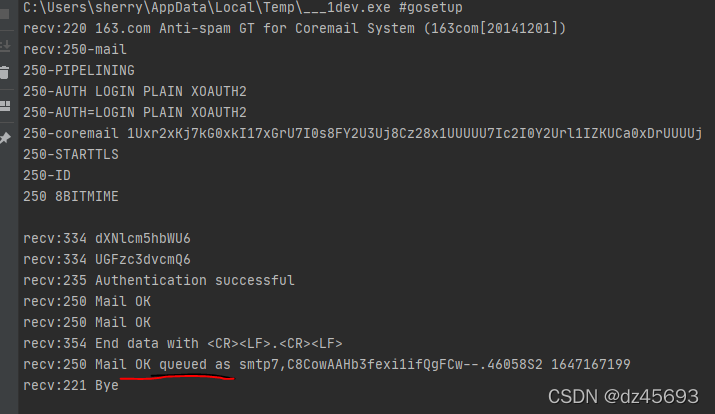
运行结果如下:
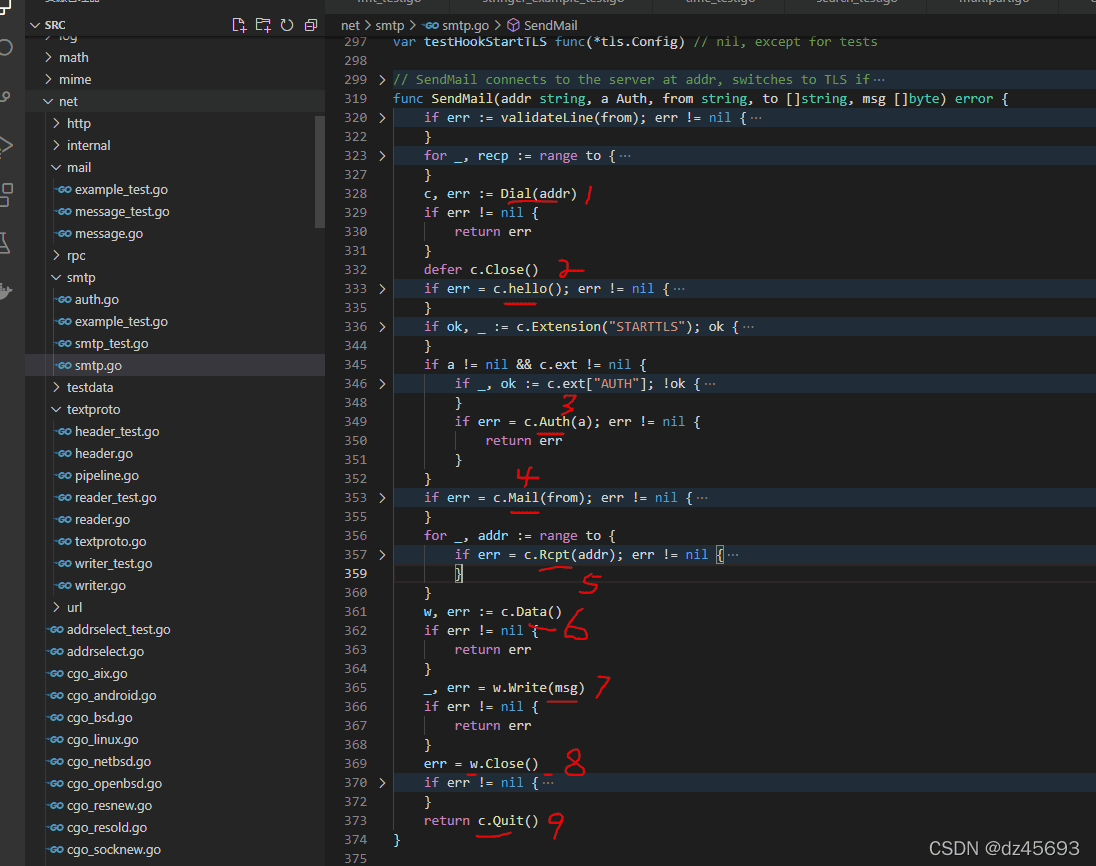
sdk中SendMail方法
在go的sdk中提供了SendMail方法【发送邮件后这个方法会关闭链接】,实现如下:
实现如下:
 func SendMailBySmtp(){
	auth := smtp.PlainAuth("", "dz45693@163.com", "xxx", "smtp.163.com")
	to := []string{"dz45693@sina.com"}
	image,_:=ioutil.ReadFile("d:\\Downloads\\1.png")
	imageBase64:=base64.StdEncoding.EncodeToString(image)
	msg := []byte("from:dz45693@163.com\r\n"+
		"to: dz45693@sina.com\r\n" +
		"Subject: hello,subject!\r\n"+
		"Content-Type:multipart/mixed;boundary=a\r\n"+
		"Mime-Version:1.0\r\n"+
		"\r\n" +
		"--a\r\n"+
		"Content-type:text/plain;charset=utf-8\r\n"+
		"Content-Transfer-Encoding:quoted-printable\r\n"+
		"\r\n"+
		"此处为正文内容!\r\n"+
		"--a\r\n"+
		"Content-type:image/jpg;name=1.jpg\r\n"+
		"Content-Transfer-Encoding:base64\r\n"+
		"\r\n"+
		imageBase64+"\r\n"+
		"--a--\r\n")
	err := smtp.SendMail("smtp.163.com:25", auth, "dz45693@163.com", to, msg)
	if err != nil {
		fmt.Println(err)
	}
}
运行效果:

使用第三方库gomail实现邮件的发送更多了解,
请前往:https://pkg.go.dev/gopkg.in/gomail.v2?utm_source=godoc
示例如下:
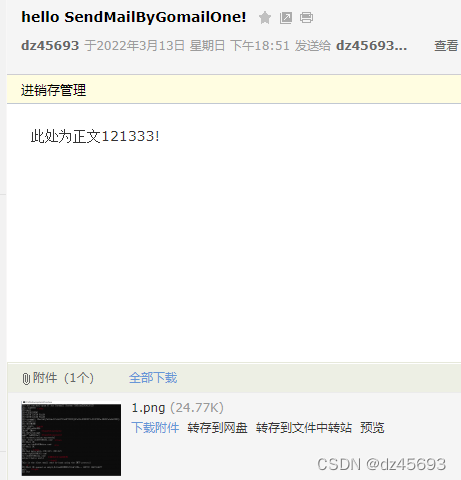
func SendMailByGomailOne(){
	m := gomail.NewMessage()
	m.SetAddressHeader("From", "dz45693@163.com", "dz45693")
	m.SetHeader("To", "dz45693@sina.com")
	m.SetHeader("Subject", "hello SendMailByGomailOne!")
	m.Embed("d:\\Downloads\\1.png")
	m.SetBody("text/html", "此处为正文121333!")
	d := gomail.NewDialer("smtp.163.com", 25, "dz45693@163.com", "xxxx")
	if err := d.DialAndSend(m); err != nil {
		panic(err)
	}
}
运行结果:
DialAndSend实现
来我们看看DialAndSend的实现如下:
package gomail
import (
	"crypto/tls"
	"fmt"
	"io"
	"net"
	"net/smtp"
	"strings"
	"time"
)
// A Dialer is a dialer to an SMTP server.
type Dialer struct {
	// Host represents the host of the SMTP server.
	Host string
	// Port represents the port of the SMTP server.
	Port int
	// Username is the username to use to authenticate to the SMTP server.
	Username string
	// Password is the password to use to authenticate to the SMTP server.
	Password string
	// Auth represents the authentication mechanism used to authenticate to the
	// SMTP server.
	Auth smtp.Auth
	// SSL defines whether an SSL connection is used. It should be false in
	// most cases since the authentication mechanism should use the STARTTLS
	// extension instead.
	SSL bool
	// TSLConfig represents the TLS configuration used for the TLS (when the
	// STARTTLS extension is used) or SSL connection.
	TLSConfig *tls.Config
	// LocalName is the hostname sent to the SMTP server with the HELO command.
	// By default, "localhost" is sent.
	LocalName string
}
// NewDialer returns a new SMTP Dialer. The given parameters are used to connect
// to the SMTP server.
func NewDialer(host string, port int, username, password string) *Dialer {
	return &Dialer{
		Host:     host,
		Port:     port,
		Username: username,
		Password: password,
		SSL:      port == 465,
	}
}
// NewPlainDialer returns a new SMTP Dialer. The given parameters are used to
// connect to the SMTP server.
//
// Deprecated: Use NewDialer instead.
func NewPlainDialer(host string, port int, username, password string) *Dialer {
	return NewDialer(host, port, username, password)
}
// Dial dials and authenticates to an SMTP server. The returned SendCloser
// should be closed when done using it.
func (d *Dialer) Dial() (SendCloser, error) {
	conn, err := netDialTimeout("tcp", addr(d.Host, d.Port), 10*time.Second)
	if err != nil {
		return nil, err
	}
	if d.SSL {
		conn = tlsClient(conn, d.tlsConfig())
	}
	c, err := smtpNewClient(conn, d.Host)
	if err != nil {
		return nil, err
	}
	if d.LocalName != "" {
		if err := c.Hello(d.LocalName); err != nil {
			return nil, err
		}
	}
	if !d.SSL {
		if ok, _ := c.Extension("STARTTLS"); ok {
			if err := c.StartTLS(d.tlsConfig()); err != nil {
				c.Close()
				return nil, err
			}
		}
	}
	if d.Auth == nil && d.Username != "" {
		if ok, auths := c.Extension("AUTH"); ok {
			if strings.Contains(auths, "CRAM-MD5") {
				d.Auth = smtp.CRAMMD5Auth(d.Username, d.Password)
			} else if strings.Contains(auths, "LOGIN") &&
				!strings.Contains(auths, "PLAIN") {
				d.Auth = &loginAuth{
					username: d.Username,
					password: d.Password,
					host:     d.Host,
				}
			} else {
				d.Auth = smtp.PlainAuth("", d.Username, d.Password, d.Host)
			}
		}
	}
	if d.Auth != nil {
		if err = c.Auth(d.Auth); err != nil {
			c.Close()
			return nil, err
		}
	}
	return &smtpSender{c, d}, nil
}
func (d *Dialer) tlsConfig() *tls.Config {
	if d.TLSConfig == nil {
		return &tls.Config{ServerName: d.Host}
	}
	return d.TLSConfig
}
func addr(host string, port int) string {
	return fmt.Sprintf("%s:%d", host, port)
}
// DialAndSend opens a connection to the SMTP server, sends the given emails and
// closes the connection.
func (d *Dialer) DialAndSend(m ...*Message) error {
	s, err := d.Dial()
	if err != nil {
		return err
	}
	defer s.Close()
	return Send(s, m...)
}
type smtpSender struct {
	smtpClient
	d *Dialer
}
func (c *smtpSender) Send(from string, to []string, msg io.WriterTo) error {
	if err := c.Mail(from); err != nil {
		if err == io.EOF {
			// This is probably due to a timeout, so reconnect and try again.
			sc, derr := c.d.Dial()
			if derr == nil {
				if s, ok := sc.(*smtpSender); ok {
					*c = *s
					return c.Send(from, to, msg)
				}
			}
		}
		return err
	}
	for _, addr := range to {
		if err := c.Rcpt(addr); err != nil {
			return err
		}
	}
	w, err := c.Data()
	if err != nil {
		return err
	}
	if _, err = msg.WriteTo(w); err != nil {
		w.Close()
		return err
	}
	return w.Close()
}
func (c *smtpSender) Close() error {
	return c.Quit()
}
// Stubbed out for tests.
var (
	netDialTimeout = net.DialTimeout
	tlsClient      = tls.Client
	smtpNewClient  = func(conn net.Conn, host string) (smtpClient, error) {
		return smtp.NewClient(conn, host)
	}
)
type smtpClient interface {
	Hello(string) error
	Extension(string) (bool, string)
	StartTLS(*tls.Config) error
	Auth(smtp.Auth) error
	Mail(string) error
	Rcpt(string) error
	Data() (io.WriteCloser, error)
	Quit() error
	Close() error
}
DialAndSend ,首先调用Dial方法创建连接,然后发送邮件,最后关闭链接,如果要频繁发邮件,那么是否保持长连接更好了?这里的Dial 调用了smtp.NewClient 创建smtp.Client对象c,然后调用c.Hello ,c.Auth,send 实际是调用c.Mail,c.Rcpt,c.Data,那么我们可以自己调用Dial方法 然后循环调用send方法,最后在close。
代码如下:
func SendMailByGomailTwo() {
	d := gomail.NewDialer("smtp.163.com", 25, "dz45693@163.com", "xxxx")
	m := gomail.NewMessage()
	m.SetAddressHeader("From", "dz45693@163.com", "dz45693")
	m.SetHeader("To", "dz45693@sina.com")
	m.SetHeader("Subject", "hello SendMailByGomailtwo!")
	m.Embed("d:\\Downloads\\1.png")
	m.SetBody("text/html", "此处为正文121333!SendMailByGomailtwo")
	s, err := d.Dial()
	if err != nil {
		panic(err)
	}
	defer s.Close()
	err = gomail.Send(s, m)
	if err != nil {
		panic(err)
	}
	m.Reset()
	m.SetAddressHeader("From", "dz45693@163.com", "dz45693")
	m.SetHeader("To", "dz45693@sina.com")
	m.SetHeader("Subject", "hello SendMailByGomailthree!")
	m.Embed("d:\\Downloads\\2.png")
	m.SetBody("text/html", "此处为正文1SendMailByGomailthreeSendMailByGomailthree!")
	err = gomail.Send(s, m)
	if err != nil {
		panic(err)
	}
}
运行结果:

到这里,我们也就讲完了《go smtp实现邮件发送示例详解》的内容了。个人认为,基础知识的学习和巩固,是为了更好的将其运用到项目中,欢迎关注golang学习网公众号,带你了解更多关于golang的知识点!
版本声明
本文转载于:脚本之家 如有侵犯,请联系study_golang@163.com删除
 Go语言入门exec的基本使用示例
- 上一篇
- Go语言入门exec的基本使用示例

- 下一篇
- go GCM gin中间件的加密解密文件流处理
评论列表
-

- 受伤的秋天
- 这篇技术文章出现的刚刚好,太全面了,写的不错,码起来,关注楼主了!希望楼主能多写Golang相关的文章。
- 2023-01-17 14:51:50
-
- 天真的棉花糖
- 这篇文章真及时,好细啊,很好,码起来,关注楼主了!希望楼主能多写Golang相关的文章。
- 2023-01-03 18:31:43
查看更多
最新文章
-
- Golang · Go教程 | 12小时前 | golang · 缓存 · singleflight · go · 高并发 · 后端开发 · Go 并发控制 缓存失效 请求合并 singleflight 回源
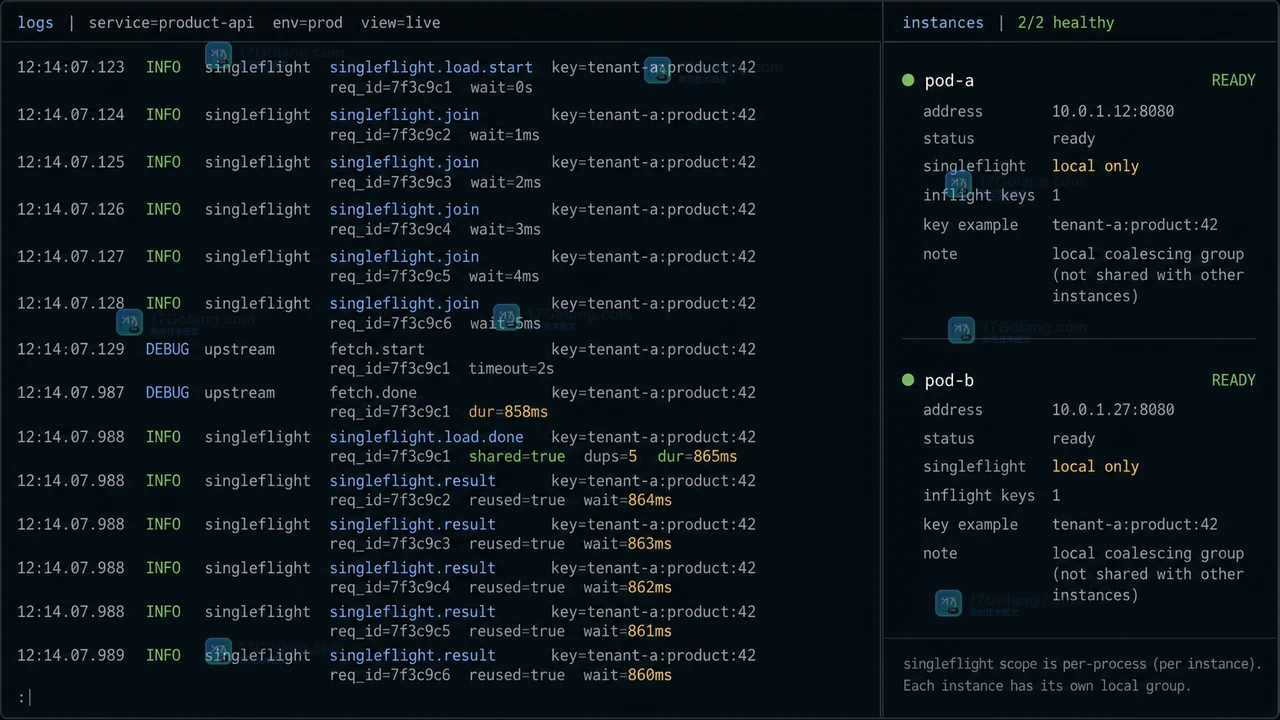
- Go singleflight 怎么合并同一请求:缓存失效时别让 500 个请求一起回源
- 109浏览 收藏
-
- Golang · Go教程 | 15小时前 | [] · []
- Go 项目 GitHub Actions 怎么设质量门禁:go vet、go test 与构建分阶段拦截
- 485浏览 收藏
-
- Golang · Go教程 | 15小时前 | [] · []
- Go html/template 怎么安全把后端数据交给前端:别把 JSON 硬塞进 template.JS
- 177浏览 收藏
-

- Golang · Go教程 | 18小时前 | 前端开发 · Go教程 · html/template · 网页模板 · 导航 · Go html/template CurrentPath 导航高亮 template.FuncMap Go网页模板
- Go html/template 怎么高亮当前导航:传入 CurrentPath 的最小写法
- 409浏览 收藏
-
![Go 拼接字符串怎么选:strings.Builder、bytes.Buffer 和 []byte 的边界](/uploads/20260716/1784195965-01-builder-timeline.webp)
- Golang · Go教程 | 1天前 | 标准库 · 基准测试 · Go教程 · 字符串拼接 · Go 字符串拼接 strings.Builder bytes.Buffer []byte
- Go 拼接字符串怎么选:strings.Builder、bytes.Buffer 和 []byte 的边界
- 188浏览 收藏
-

- Golang · Go教程 | 1天前 | golang · Timer · 并发编程 · time.After · 性能排查 · time.After go timer Go 1.23 NewTimer Timer.Reset Timer.Stop
- Go 1.23 以后还要手动 Stop Timer 吗:一次超时循环改造实战
- 403浏览 收藏
-
- Golang · Go教程 | 1天前 | 并发 · 错误处理 · go · Context · 排错 · Go 错误链 context.WithCancelCause context.Cause 取消原因
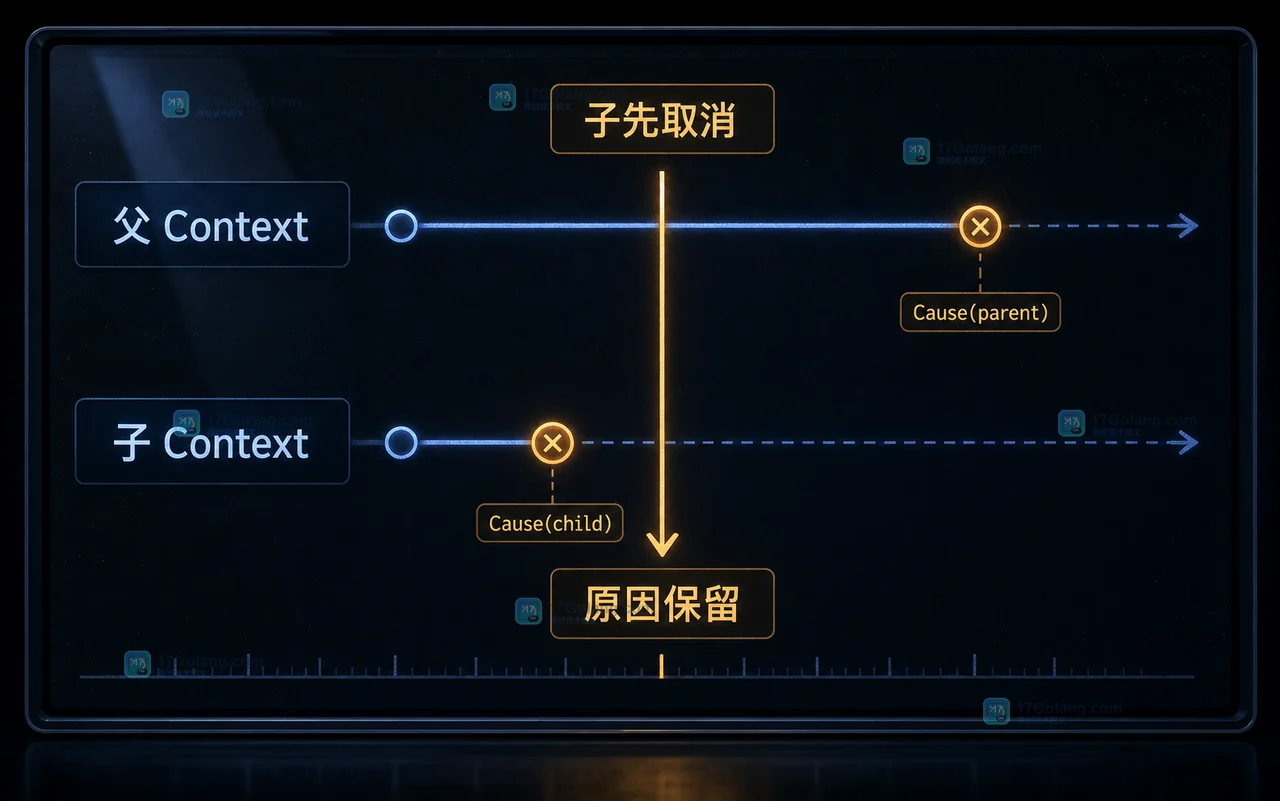
- Go context.WithCancelCause 怎么用:让中断原因能被日志和调用方看见
- 366浏览 收藏
-

- Golang · Go教程 | 1天前 | 并发 · WaitGroup · go · worker pool · 服务停机 · Go channel WaitGroup 优雅停机 worker pool 任务排空
- Go worker pool 停机时任务为什么会丢?关闭顺序、WaitGroup 和排空策略
- 207浏览 收藏
-
- Golang · Go教程 | 1天前 | 切片 · Slices · Go教程 · Go 1.21 · 切片删除 Go教程 Go slices.Delete slices.DeleteFunc Go 1.21
- Go slices.Delete 怎么用?删除元素后为什么一定要接收返回切片
- 463浏览 收藏
-
- Golang · Go教程 | 1天前 | HTTP · Go教程 · 服务治理 · Shutdown · SIGTERM · SIGTERM Go 优雅关闭 http.Server Shutdown Go HTTP 服务 连接收尾 服务下线
- Go HTTP 服务优雅关闭怎么做?Shutdown、超时和连接收尾的取舍
- 316浏览 收藏

查看更多
课程推荐
-

- 前端进阶之JavaScript设计模式
- 设计模式是开发人员在软件开发过程中面临一般问题时的解决方案,代表了最佳的实践。本课程的主打内容包括JS常见设计模式以及具体应用场景,打造一站式知识长龙服务,适合有JS基础的同学学习。
- 543次学习
-

- GO语言核心编程课程
- 本课程采用真实案例,全面具体可落地,从理论到实践,一步一步将GO核心编程技术、编程思想、底层实现融会贯通,使学习者贴近时代脉搏,做IT互联网时代的弄潮儿。
- 516次学习
-

- 简单聊聊mysql8与网络通信
- 如有问题加微信:Le-studyg;在课程中,我们将首先介绍MySQL8的新特性,包括性能优化、安全增强、新数据类型等,帮助学生快速熟悉MySQL8的最新功能。接着,我们将深入解析MySQL的网络通信机制,包括协议、连接管理、数据传输等,让
- 500次学习
-
- JavaScript正则表达式基础与实战
- 在任何一门编程语言中,正则表达式,都是一项重要的知识,它提供了高效的字符串匹配与捕获机制,可以极大的简化程序设计。
- 487次学习
-

- 从零制作响应式网站—Grid布局
- 本系列教程将展示从零制作一个假想的网络科技公司官网,分为导航,轮播,关于我们,成功案例,服务流程,团队介绍,数据部分,公司动态,底部信息等内容区块。网站整体采用CSSGrid布局,支持响应式,有流畅过渡和展现动画。
- 485次学习
查看更多
AI推荐
-

- ljg-skills
- ljg-skills 是李继刚开源的 AI 技能与提示词集合,面向大模型使用者整理了一批可复用的 prompt、角色设定和任务技能模板,适合用于学习提示词设计、搭建个人 AI 工作流和沉淀团队常用智能体能力。
- 4535次使用
-

- MELO音乐
- MELO音乐是一站式AI视频与音乐制作助手,对标suno, udio的高品质体验。提供伴奏生成、原创写词、无损导出、哼唱识曲、混音变声等全套音频与短视频编辑工具。无论是流行Kpop、电音说唱、民谣古风、摇滚儿歌还是商用轻音乐,MELO为你免费谱曲,轻松做同款!
- 4209次使用
-

- UniScribe
- UniScribe 是一款 AI 音视频转文字与内容整理工具,支持上传音频、视频文件或粘贴 YouTube 链接,自动生成转写文本、摘要、思维导图和关键问题,并支持多格式导出,适合会议记录、课程学习、访谈整理和内容创作复盘。
- 4168次使用
-

- 剧云
- 剧云是专业中文剧本创作平台,安全稳定运行十余年,集成AI编剧、剧本医生审核、人物小传、剧情关系图、大纲编写、多人协作、Word导入导出、版权管控功能,数据安全防护,轻松高效创作剧本。
- 4392次使用
-

- 万象有声
- 万象有声,一个专为有声创作者打造的新一代智能有声内容创作平台。平台提供专业的智能拆章、智能画本编辑、AI配音、AI生成音效、后期制作、智能对轨、智能审听等有声创作全流程工具,可以帮助创作者高效、低成本创作出引人入胜的有声作品。立即体验,让有声书制作更简单!
- 4338次使用
查看更多
相关文章
-
- Java 性能优化上线清单:从定位、改造到灰度发布
- 2026-06-11 860浏览
-
- Spring Boot 压测验证:Gatling、JMeter 与性能回归门禁
- 2026-06-11 843浏览
-
- Java NMT 非堆内存排查:Direct Buffer、线程栈与 Metaspace 分析
- 2026-06-11 826浏览
-
- Spring Boot 容器内存优化:JVM 堆、非堆与 MaxRAMPercentage
- 2026-06-11 809浏览
-
- Tomcat 连接与线程参数调优:maxThreads、acceptCount 与 KeepAlive
- 2026-06-11 792浏览