使用golang创建REST API以通过SSH隧道发送消息的方法
来源:stackoverflow
2024-02-18 22:51:30
0浏览
收藏
最近发现不少小伙伴都对Golang很感兴趣,所以今天继续给大家介绍Golang相关的知识,本文《使用golang创建REST API以通过SSH隧道发送消息的方法》主要内容涉及到等等知识点,希望能帮到你!当然如果阅读本文时存在不同想法,可以在评论中表达,但是请勿使用过激的措辞~
问题内容
我想构建一个 ssh 服务器来与 ssh 客户端通信。
所以,我想构建两个rest api服务器,服务器A作为主机,服务器B作为客户端。 假设服务器 A 在防火墙后面,而服务器 B 不在防火墙后面,那么我想建立 ssh 隧道,以便在该隧道内 A 和 B 之间进行通信。
当A处于活动状态并输入IP地址B时,A可以向B发送电子邮件或消息,其中包括A自己的IP地址。B获取A的IP地址后,服务器B将向A发送消息。
谁能一步步解释一下如何用 golang 构建这样的 ssh 隧道?如果有的话,我要求参考资料来制作代码?谢谢
正确答案
一种解决方案是在 bash 中创建 ssh 隧道并将脚本指向它。然而: 您可能需要编写对于 bash 来说过于复杂的脚本。 如果您需要运行多个隧道或忘记清理长时间运行的进程,它可能会使您的脚本变得脆弱。 您可能无法访问单独的终端来运行 ssh 隧道,例如在某些自动化脚本下。 想要使用所有现有的 go 代码,但又想使用隧道。 不喜欢bash。 好吧,给你。以下代码支持在纯 go 中创建多个无障碍 ssh 隧道,并支持使用私钥或密码身份验证:
package main
import (
    "fmt"
    "golang.org/x/crypto/ssh"
    "io"
    "io/ioutil"
    "log"
    "net"
    "strconv"
    "strings"
)
type endpoint struct {
    host string
    port int
    user string
}
func newendpoint(s string) *endpoint {
    endpoint := &endpoint{
        host: s,
    }
    if parts := strings.split(endpoint.host, "@"); len(parts) > 1 {
        endpoint.user = parts[0]
        endpoint.host = parts[1]
    }
    if parts := strings.split(endpoint.host, ":"); len(parts) > 1 {
        endpoint.host = parts[0]
        endpoint.port, _ = strconv.atoi(parts[1])
    }
    return endpoint
}
func (endpoint *endpoint) string() string {
    return fmt.sprintf("%s:%d", endpoint.host, endpoint.port)
}
type sshtunnel struct {
    local  *endpoint
    server *endpoint
    remote *endpoint
    config *ssh.clientconfig
    log    *log.logger
}
func (tunnel *sshtunnel) logf(fmt string, args ...interface{}) {
    if tunnel.log != nil {
        tunnel.log.printf(fmt, args...)
    }
}
func (tunnel *sshtunnel) start() error {
    listener, err := net.listen("tcp", tunnel.local.string())
    if err != nil {
        return err
    }
    defer listener.close()
    tunnel.local.port = listener.addr().(*net.tcpaddr).port
    for {
        conn, err := listener.accept()
        if err != nil {
            return err
        }
        tunnel.logf("accepted connection")
        go tunnel.forward(conn)
    }
}
func (tunnel *sshtunnel) forward(localconn net.conn) {
    serverconn, err := ssh.dial("tcp", tunnel.server.string(), tunnel.config)
    if err != nil {
        tunnel.logf("server dial error: %s", err)
        return
    }
    tunnel.logf("connected to %s (1 of 2)\n", tunnel.server.string())
    remoteconn, err := serverconn.dial("tcp", tunnel.remote.string())
    if err != nil {
        tunnel.logf("remote dial error: %s", err)
        return
    }
    tunnel.logf("connected to %s (2 of 2)\n", tunnel.remote.string())
    copyconn := func(writer, reader net.conn) {
        _, err := io.copy(writer, reader)
        if err != nil {
            tunnel.logf("io.copy error: %s", err)
        }
    }
    go copyconn(localconn, remoteconn)
    go copyconn(remoteconn, localconn)
}
func privatekeyfile(file string) ssh.authmethod {
    buffer, err := ioutil.readfile(file)
    if err != nil {
        return nil
    }
    key, err := ssh.parseprivatekey(buffer)
    if err != nil {
        return nil
    }
    return ssh.publickeys(key)
}
func newsshtunnel(tunnel string, auth ssh.authmethod, destination string) *sshtunnel {
    // a random port will be chosen for us.
    localendpoint := newendpoint("localhost:0")
    server := newendpoint(tunnel)
    if server.port == 0 {
        server.port = 22
    }
    sshtunnel := &sshtunnel{
        config: &ssh.clientconfig{
            user: server.user,
            auth: []ssh.authmethod{auth},
            hostkeycallback: func(hostname string, remote net.addr, key ssh.publickey) error {
                // always accept key.
                return nil
            },
        },
        local:  localendpoint,
        server: server,
        remote: newendpoint(destination),
    }
    return sshtunnel
}
这是一个使用示例:
func main() {
   // Setup the tunnel, but do not yet start it yet.
   tunnel := NewSSHTunnel(
      // User and host of tunnel server, it will default to port 22
      // if not specified.
      "[email protected]",
      // Pick ONE of the following authentication methods:
      PrivateKeyFile("path/to/private/key.pem"), // 1. private key
      ssh.Password("password"),                  // 2. password
      // The destination host and port of the actual server.
      "dqrsdfdssdfx.us-east-1.redshift.amazonaws.com:5439",
   )
   // You can provide a logger for debugging, or remove this line to
   // make it silent.
   tunnel.Log = log.New(os.Stdout, "", log.Ldate | log.Lmicroseconds)
   // Start the server in the background. You will need to wait a
   // small amount of time for it to bind to the localhost port
   // before you can start sending connections.
   go tunnel.Start()
   time.Sleep(100 * time.Millisecond)
   // NewSSHTunnel will bind to a random port so that you can have
   // multiple SSH tunnels available. The port is available through:
   //   tunnel.Local.Port

   // You can use any normal Go code to connect to the destination
   // server through localhost. You may need to use 127.0.0.1 for
   // some libraries.
   //
   // Here is an example of connecting to a PostgreSQL server:
   conn := fmt.Sprintf("host=127.0.0.1 port=%d username=foo", tunnel.Local.Port)
   db, err := sql.Open("postgres", conn)
   // ...
}
本篇关于《使用golang创建REST API以通过SSH隧道发送消息的方法》的介绍就到此结束啦,但是学无止境,想要了解学习更多关于Golang的相关知识,请关注golang学习网公众号!
版本声明
本文转载于:stackoverflow 如有侵犯,请联系study_golang@163.com删除
 SQL中ALTER语句的作用是什么?
- 上一篇
- SQL中ALTER语句的作用是什么?

- 下一篇
- MySQL索引的底层工作原理
查看更多
最新文章
-

- Golang · Go问答 | 6小时前 |
- Go slog 日志字段怎么安全流转:Attr、Handler 与敏感信息边界
- 193浏览 收藏
-
- Golang · Go问答 | 7小时前 |
- Go bufio.Scanner 为什么读不完整长行:Buffer 上限、SplitFunc 与流式边界
- 391浏览 收藏
-

- Golang · Go问答 | 8小时前 | net/http · Go问答 · HTTP重试 · 请求体 · 接口稳定性 · net/http Go HTTP重试 Request.GetBody Request.Clone 请求体复用
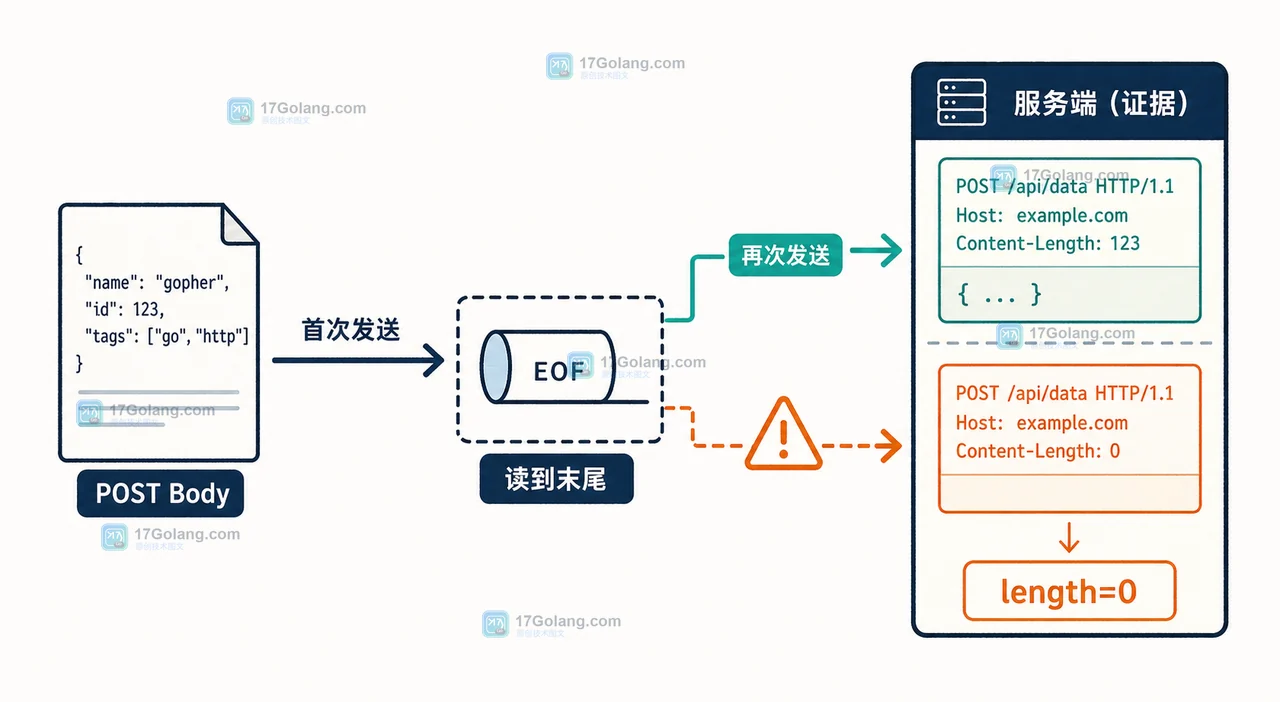
- Go HTTP 重试为什么请求体变空:GetBody、Request.Clone 与可重放边界
- 273浏览 收藏
-

- Golang · Go问答 | 8小时前 | go · 安全 · net/http · HTTP重定向 · 请求头 · 请求头 Authorization 安全边界 CheckRedirect Go HTTP重定向
- Go HTTP 重定向为什么请求头会消失:CheckRedirect 与敏感头安全边界
- 268浏览 收藏
-

- Golang · Go问答 | 9小时前 | 错误处理 · go · SQL · database/sql · 线上排查 · SCAN 查询结果 database/sql Go问答 rows.Next Rows.Err
- Go rows.Next 返回 false 不一定是查完:Err、Close 和扫描失败怎么定位
- 292浏览 收藏
-

- Golang · Go问答 | 9小时前 | 超时 · 错误处理 · go · Context · errors.Is Go context deadline exceeded WithCancelCause
- Go context deadline exceeded 怎么区分上游取消和下游超时:Cause 与 errors.Is 的判断顺序
- 309浏览 收藏
-
- Golang · Go问答 | 12小时前 |
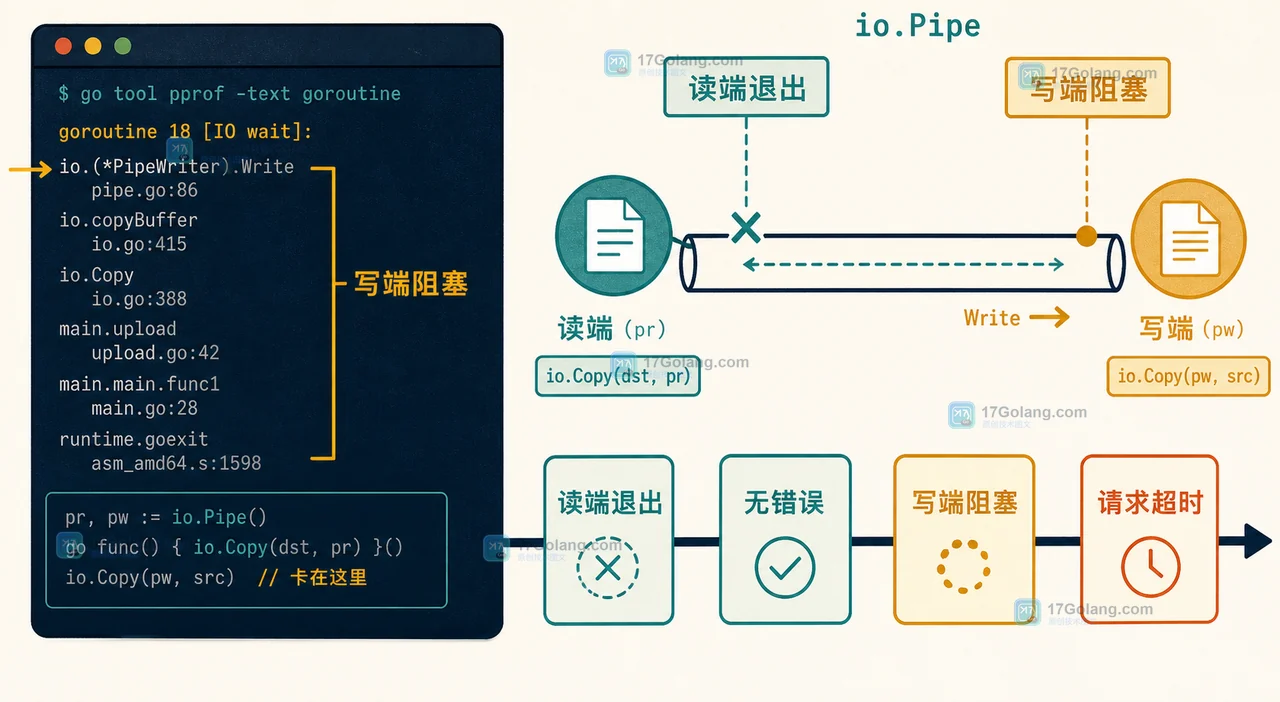
- Go io.Pipe 流式上传为什么会卡住:CloseWithError、背压与退出顺序
- 182浏览 收藏
-

- Golang · Go问答 | 23小时前 | 标准库 · bufio · 网络协议 · Go问答 · 流式读取 · peek Go bufio.Reader 协议解析 Go问答 Discard UnreadByte
- Go bufio.Reader 解析变长帧时怎么划分边界:Peek、Discard 与 UnreadByte
- 414浏览 收藏

查看更多
课程推荐
-

- 前端进阶之JavaScript设计模式
- 设计模式是开发人员在软件开发过程中面临一般问题时的解决方案,代表了最佳的实践。本课程的主打内容包括JS常见设计模式以及具体应用场景,打造一站式知识长龙服务,适合有JS基础的同学学习。
- 543次学习
-

- GO语言核心编程课程
- 本课程采用真实案例,全面具体可落地,从理论到实践,一步一步将GO核心编程技术、编程思想、底层实现融会贯通,使学习者贴近时代脉搏,做IT互联网时代的弄潮儿。
- 516次学习
-

- 简单聊聊mysql8与网络通信
- 如有问题加微信:Le-studyg;在课程中,我们将首先介绍MySQL8的新特性,包括性能优化、安全增强、新数据类型等,帮助学生快速熟悉MySQL8的最新功能。接着,我们将深入解析MySQL的网络通信机制,包括协议、连接管理、数据传输等,让
- 500次学习
-
- JavaScript正则表达式基础与实战
- 在任何一门编程语言中,正则表达式,都是一项重要的知识,它提供了高效的字符串匹配与捕获机制,可以极大的简化程序设计。
- 487次学习
-

- 从零制作响应式网站—Grid布局
- 本系列教程将展示从零制作一个假想的网络科技公司官网,分为导航,轮播,关于我们,成功案例,服务流程,团队介绍,数据部分,公司动态,底部信息等内容区块。网站整体采用CSSGrid布局,支持响应式,有流畅过渡和展现动画。
- 485次学习
查看更多
AI推荐
-

- ljg-skills
- ljg-skills 是李继刚开源的 AI 技能与提示词集合,面向大模型使用者整理了一批可复用的 prompt、角色设定和任务技能模板,适合用于学习提示词设计、搭建个人 AI 工作流和沉淀团队常用智能体能力。
- 4660次使用
-

- MELO音乐
- MELO音乐是一站式AI视频与音乐制作助手,对标suno, udio的高品质体验。提供伴奏生成、原创写词、无损导出、哼唱识曲、混音变声等全套音频与短视频编辑工具。无论是流行Kpop、电音说唱、民谣古风、摇滚儿歌还是商用轻音乐,MELO为你免费谱曲,轻松做同款!
- 4273次使用
-

- UniScribe
- UniScribe 是一款 AI 音视频转文字与内容整理工具,支持上传音频、视频文件或粘贴 YouTube 链接,自动生成转写文本、摘要、思维导图和关键问题,并支持多格式导出,适合会议记录、课程学习、访谈整理和内容创作复盘。
- 4229次使用
-

- 剧云
- 剧云是专业中文剧本创作平台,安全稳定运行十余年,集成AI编剧、剧本医生审核、人物小传、剧情关系图、大纲编写、多人协作、Word导入导出、版权管控功能,数据安全防护,轻松高效创作剧本。
- 4447次使用
-

- 万象有声
- 万象有声,一个专为有声创作者打造的新一代智能有声内容创作平台。平台提供专业的智能拆章、智能画本编辑、AI配音、AI生成音效、后期制作、智能对轨、智能审听等有声创作全流程工具,可以帮助创作者高效、低成本创作出引人入胜的有声作品。立即体验,让有声书制作更简单!
- 4411次使用
查看更多
相关文章
-
- 用Nginx反向代理部署go写的网站。
- 2023-01-17 502浏览
-
- GoLand调式动态执行代码
- 2023-01-13 502浏览
-
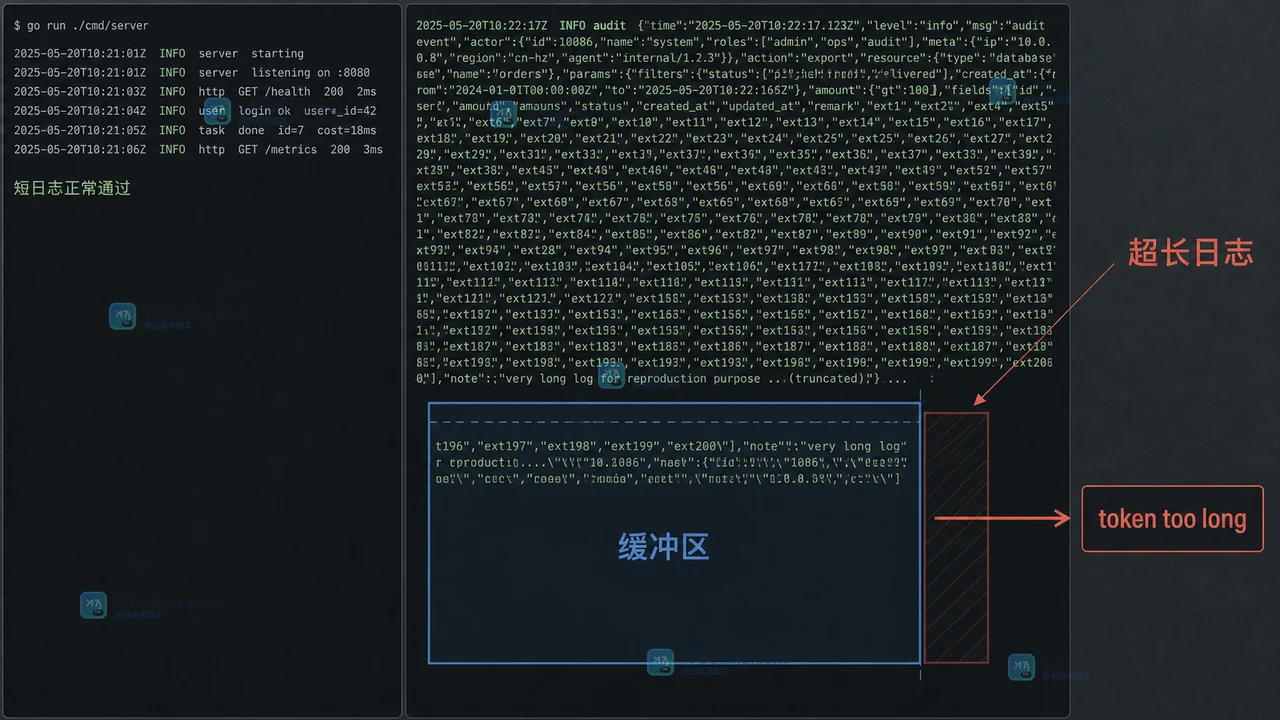
- Go bufio.Scanner 遇到 token too long 怎么办:大日志行的长度上限与内存取舍
- 2026-07-22 501浏览
-
- 从不同的 go 例程将数据写入同一通道无需等待组即可正常工作
- 2024-04-29 501浏览
-
- Golang rsa-oaep解密失败,前端使用webcrypto
- 2024-04-26 501浏览