Angular表单验证与Material样式教程
本教程旨在解决Angular开发中常见的表单验证与Material样式问题,助力开发者构建更完善的应用。针对响应式表单跨字段验证,例如密码确认,文章详细阐述了如何通过自定义表单组验证器实现字段间的校验逻辑,确保验证的准确性和用户体验。同时,对于Angular Material组件样式未正确加载的问题,提供了全面的排查与解决方案,包括模块导入、主题配置等关键步骤。通过本文,你将掌握Angular表单验证的最佳实践,并能有效解决Material组件样式问题,提升用户界面的美观度和可用性,让你的Angular应用更上一层楼。

解决Angular表单跨字段验证问题
在Angular响应式表单中,处理依赖于多个字段的验证逻辑(如密码确认)是一个常见需求。原始代码中,getConfirmPasswordErrorMessage() 函数虽然能够返回错误消息,但它仅仅是根据当前confirmPassword控件的状态来判断,并没有主动地“标记”该控件为无效。当confirmPassword控件没有内置的required或minlength等验证器错误时,即使password.value !== this.confirmPassword.value为真,confirmPassword.invalid也可能为false,从而导致错误消息不显示。
问题分析:
mat-error组件只有在其关联的FormControl被标记为invalid时才会显示。getConfirmPasswordErrorMessage()函数的作用是提供错误文本,但它本身并不能改变FormControl的valid或invalid状态。要实现跨字段验证,我们需要一个验证器来主动设置相关控件或表单组的错误状态。
解决方案:自定义表单组验证器
最推荐的解决方案是创建一个自定义验证器,并将其应用于包含相关字段的FormGroup。这样,验证器可以同时访问password和confirmPassword控件的值,并在它们不匹配时将错误附加到FormGroup上。
定义自定义验证器函数: 这个验证器将接收一个AbstractControl(在此例中是FormGroup)作为参数,并返回一个错误对象(如果存在错误)或null(如果验证通过)。
// src/app/validators/password-match.validator.ts
import { AbstractControl, ValidatorFn, ValidationErrors } from '@angular/forms';

export const passwordMatchValidator: ValidatorFn = (control: AbstractControl): ValidationErrors | null => {
  const password = control.get('password');
  const confirmPassword = control.get('confirmPassword');

  if (!password || !confirmPassword) {
    return null; // 如果控件不存在,则不进行验证
  }

  // 如果确认密码有值且与密码不匹配
  if (confirmPassword.value && password.value !== confirmPassword.value) {
    // 在 confirmPassword 控件上设置一个 'passwordsMismatch' 错误
    confirmPassword.setErrors({ passwordsMismatch: true });
    return { passwordsMismatch: true }; // 也可以在 FormGroup 上设置错误
  } else if (confirmPassword.hasError('passwordsMismatch') && password.value === confirmPassword.value) {
    // 如果之前有错误,但现在匹配了,则清除错误
    confirmPassword.setErrors(null);
  }

  return null; // 验证通过
};
注意: 上述示例在confirmPassword上直接设置了错误。另一种常见做法是在FormGroup上设置错误,然后在模板中根据FormGroup的错误状态来判断。对于用户体验,通常直接在确认密码字段下方显示错误更直观。
在组件中应用验证器: 将自定义验证器作为第二个参数传递给FormBuilder.group()方法,或者通过FormGroup.setValidators()方法设置。
// src/app/your-component.component.ts
import { Component, OnInit } from '@angular/core';
import { FormGroup, FormControl, Validators, FormBuilder } from '@angular/forms';
import { passwordMatchValidator } from './validators/password-match.validator'; // 导入验证器

@Component({
  selector: 'app-your-component',
  templateUrl: './your-component.component.html',
  styleUrls: ['./your-component.component.css']
})
export class YourComponent implements OnInit {
  hidepwd = true;
  hidepwdrepeat = true;
  registrationForm: FormGroup;

  constructor(private fb: FormBuilder) {}

  ngOnInit(): void {
    this.registrationForm = this.fb.group({
      password: new FormControl('', [Validators.required]),
      confirmPassword: new FormControl('', [Validators.required])
    }, {
      validators: passwordMatchValidator // 应用自定义验证器到 FormGroup
    });

    // 监听密码字段的变化,当密码改变时重新验证确认密码
    this.registrationForm.get('password')?.valueChanges.subscribe(() => {
      this.registrationForm.get('confirmPassword')?.updateValueAndValidity();
    });
  }

  get password() {
    return this.registrationForm.get('password') as FormControl;
  }

  get confirmPassword() {
    return this.registrationForm.get('confirmPassword') as FormControl;
  }

  getPasswordErrorMessage() {
    if (this.password.hasError('required')) {
      return 'Pflichtfeld';
    }
    return '';
  }

  getConfirmPasswordErrorMessage() {
    if (this.confirmPassword.hasError('required')) {
      return 'Pflichtfeld';
    }
    // 检查自定义的密码不匹配错误
    if (this.confirmPassword.hasError('passwordsMismatch')) {
      return 'Passwörter stimmen nicht überein';
    }
    return '';
  }

  register() {
    if (this.registrationForm.valid) {
      console.log('Form is valid!', this.registrationForm.value);
      // 执行注册逻辑
    } else {
      console.log('Form is invalid!', this.registrationForm.errors);
      // 标记所有控件为 dirty/touched 以显示所有错误
      this.registrationForm.markAllAsTouched();
    }
  }
}
更新模板中的错误显示: 模板部分保持不变,因为mat-error会检查confirmPassword.invalid,而我们的验证器会正确地设置这个状态。
注意: 移除了id属性和checkPasswordMatch()事件绑定,因为formControlName会自动处理绑定,且验证器会在值变化时自动触发。
注意事项:
- 响应式表单的核心: 验证逻辑应该封装在验证器中,而不是在事件处理函数中手动检查。
- updateValueAndValidity(): 当一个控件的值变化需要影响另一个控件的验证状态时,手动调用updateValueAndValidity()非常有用,如本例中密码变化时更新确认密码的验证。
- 错误显示时机: mat-error的*ngIf条件control.invalid && (control.dirty || control.touched)是Angular Material推荐的错误显示时机,确保用户完成输入或触碰后才显示错误。
修复Angular Material组件样式问题
Angular Material组件的样式通常通过预构建的CSS主题或自定义主题来应用。如果mat-raised-button等组件没有显示预期的样式(例如,没有阴影或背景色),最常见的原因是缺少必要的Angular Material模块导入。
问题分析:
Angular Material是模块化的,每个UI组件集(如按钮、表单字段)都有自己的NgModule。如果对应的模块没有被导入到你的应用模块中,那么即使你在模板中使用了相应的HTML标签,Angular也无法找到并应用这些组件的样式和行为。
解决方案:导入必要的Material模块
确保在你的Angular模块(通常是app.module.ts或一个专门的material.module.ts)中导入了所有你正在使用的Material组件模块。
导入MatButtonModule: 对于mat-raised-button,你需要导入MatButtonModule。
// src/app/app.module.ts 或 src/app/material.module.ts (如果你有单独的Material模块)
import { NgModule } from '@angular/core';
import { BrowserModule } from '@angular/platform-browser';
import { BrowserAnimationsModule } from '@angular/platform-browser/animations'; // 动画模块
import { ReactiveFormsModule } from '@angular/forms'; // 响应式表单模块

// Angular Material Modules
import { MatFormFieldModule } from '@angular/material/form-field';
import { MatInputModule } from '@angular/material/input';
import { MatIconModule } from '@angular/material/icon';
import { MatButtonModule } from '@angular/material/button'; // <--- 确保导入此模块

import { AppComponent } from './app.component';
import { YourComponent } from './your-component.component'; // 你的组件

@NgModule({
  declarations: [
    AppComponent,
    YourComponent
  ],
  imports: [
    BrowserModule,
    BrowserAnimationsModule, // 需要这个模块来支持某些Material组件的动画
    ReactiveFormsModule,
    MatFormFieldModule,
    MatInputModule,
    MatIconModule,
    MatButtonModule // <--- 在 imports 数组中添加它
  ],
  providers: [],
  bootstrap: [AppComponent]
})
export class AppModule { }
提示: 建议创建一个单独的MaterialModule来管理所有Angular Material的导入和导出,这样可以保持AppModule的整洁。
// src/app/material.module.ts
import { NgModule } from '@angular/core';
import { MatFormFieldModule } from '@angular/material/form-field';
import { MatInputModule } from '@angular/material/input';
import { MatIconModule } from '@angular/material/icon';
import { MatButtonModule } from '@angular/material/button';

@NgModule({
  exports: [
    MatFormFieldModule,
    MatInputModule,
    MatIconModule,
    MatButtonModule
  ]
})
export class MaterialModule { }
然后在app.module.ts中导入MaterialModule:
// src/app/app.module.ts
import { MaterialModule } from './material.module'; // 导入你的MaterialModule

@NgModule({
  // ...
  imports: [
    // ...
    MaterialModule // 使用 MaterialModule
  ],
  // ...
})
export class AppModule { }
其他常见样式问题:
缺少全局主题CSS: 确保在你的angular.json文件的styles数组中或在src/styles.css(或src/styles.scss)中导入了Angular Material的预构建主题或自定义主题。例如:
/* src/styles.css */
@import '@angular/material/prebuilt-themes/indigo-pink.css';
/* 或者你自定义的主题 */
或在 angular.json 中配置:
"styles": [
  "src/styles.css",
  "node_modules/@angular/material/prebuilt-themes/indigo-pink.css"
],
缺少BrowserAnimationsModule: 某些Material组件的动画效果需要BrowserAnimationsModule。确保它已导入到你的根模块(AppModule)中。
总结
本文详细阐述了Angular应用中表单验证和Material组件样式加载的常见问题及其解决方案。对于复杂的跨字段验证,推荐使用自定义FormGroup验证器,它能更优雅地处理字段间的依赖关系,并确保错误状态的正确传递。同时,对于Material组件样式不生效的问题,核心在于确保所有使用的Material组件模块都已正确导入到Angular模块中,并检查全局主题CSS是否已正确引入。遵循这些最佳实践,将有助于构建更健壮、更用户友好的Angular应用。
终于介绍完啦!小伙伴们,这篇关于《Angular表单验证与Material样式教程》的介绍应该让你收获多多了吧!欢迎大家收藏或分享给更多需要学习的朋友吧~golang学习网公众号也会发布文章相关知识,快来关注吧!
 番茄畅听绑定微信步骤详解
- 上一篇
- 番茄畅听绑定微信步骤详解

- 下一篇
- 闲鱼跳转淘宝怎么关?关闭方法详解
-
- 文章 · 前端 | 4天前 | 定时器 · 前端 · 性能排查 · 接口请求 · 轮询 · setInterval · setInterval 页面可见性 clearInterval 前端轮询 请求堆积 定时器清理
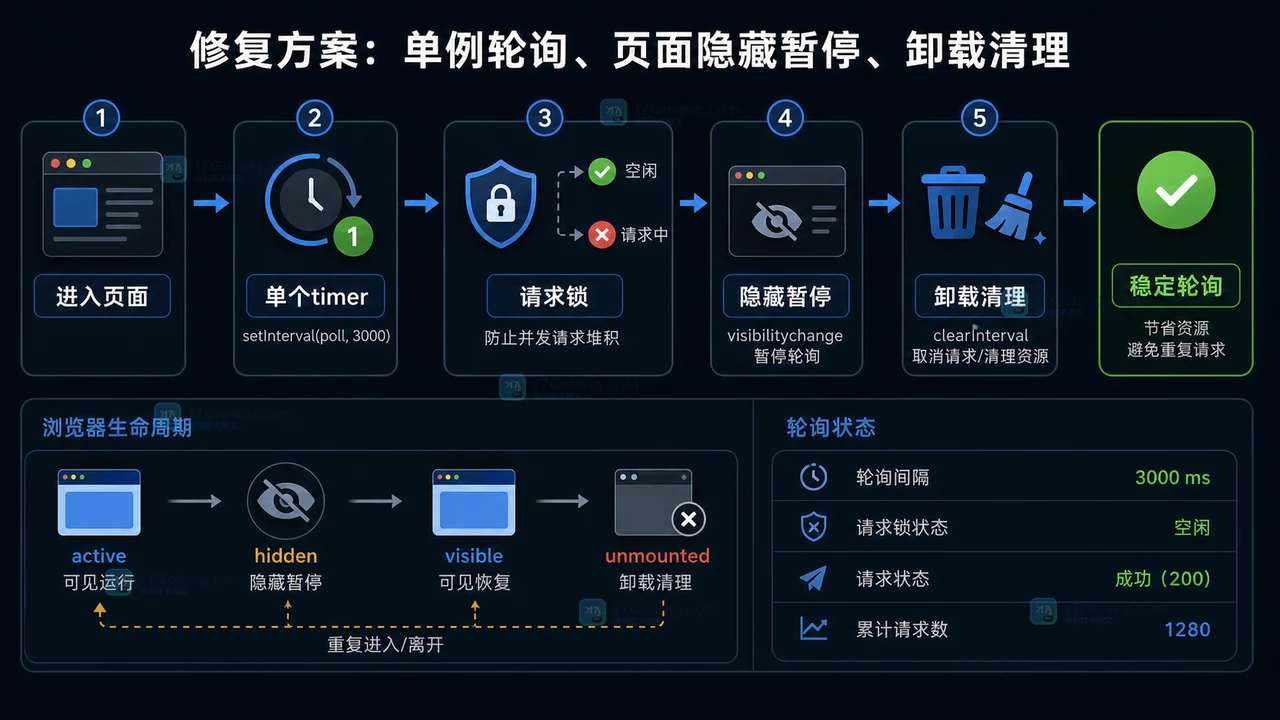
- 前端轮询接口越打越多怎么办:从重复定时器到清理机制一步步排查
- 490浏览 收藏
-
- 文章 · 前端 | 4天前 | 前端 · 搜索框 · AbortController · 接口请求 · 状态管理 · Fetch AbortController 前端搜索 请求乱序 旧响应覆盖
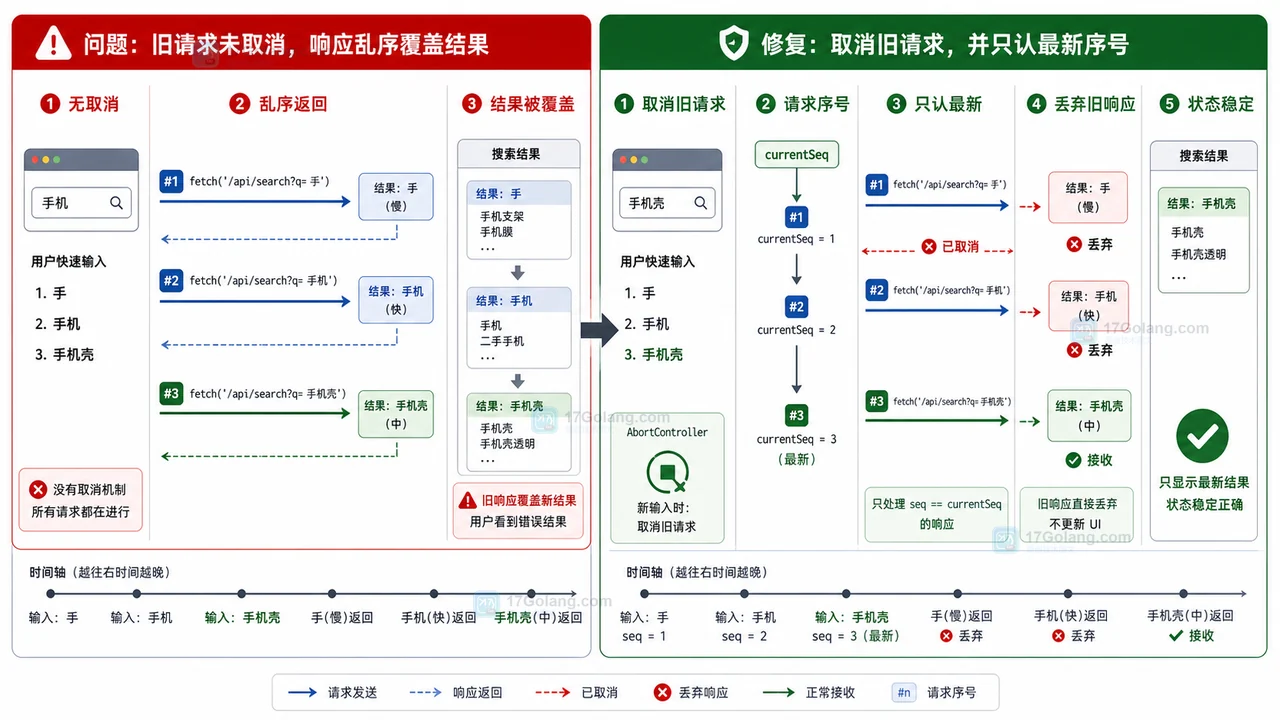
- 前端搜索结果倒退怎么办:AbortController 取消旧请求和序号兜底
- 295浏览 收藏
-
- 文章 · 前端 | 4天前 | 前端 · 性能优化 · cls · 懒加载 · Core Web Vitals · 前端 图片懒加载 IntersectionObserver CLS 布局稳定
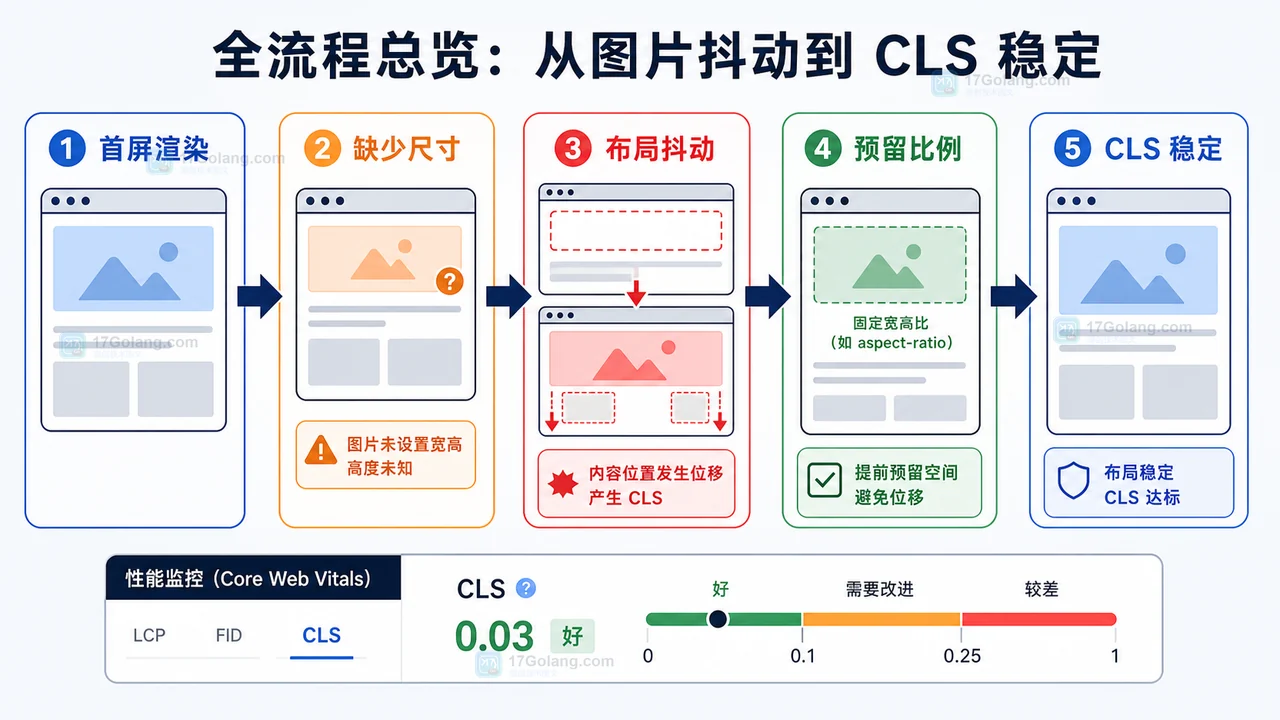
- 前端图片懒加载布局抖动治理完整流程:占位比例、按需加载和 CLS 复查
- 128浏览 收藏
-
- 文章 · 前端 | 5天前 | 工程化 · 前端 · javascript · css · 弹窗 · 前端 z-index 遮罩层 stacking context Portal 弹窗层级
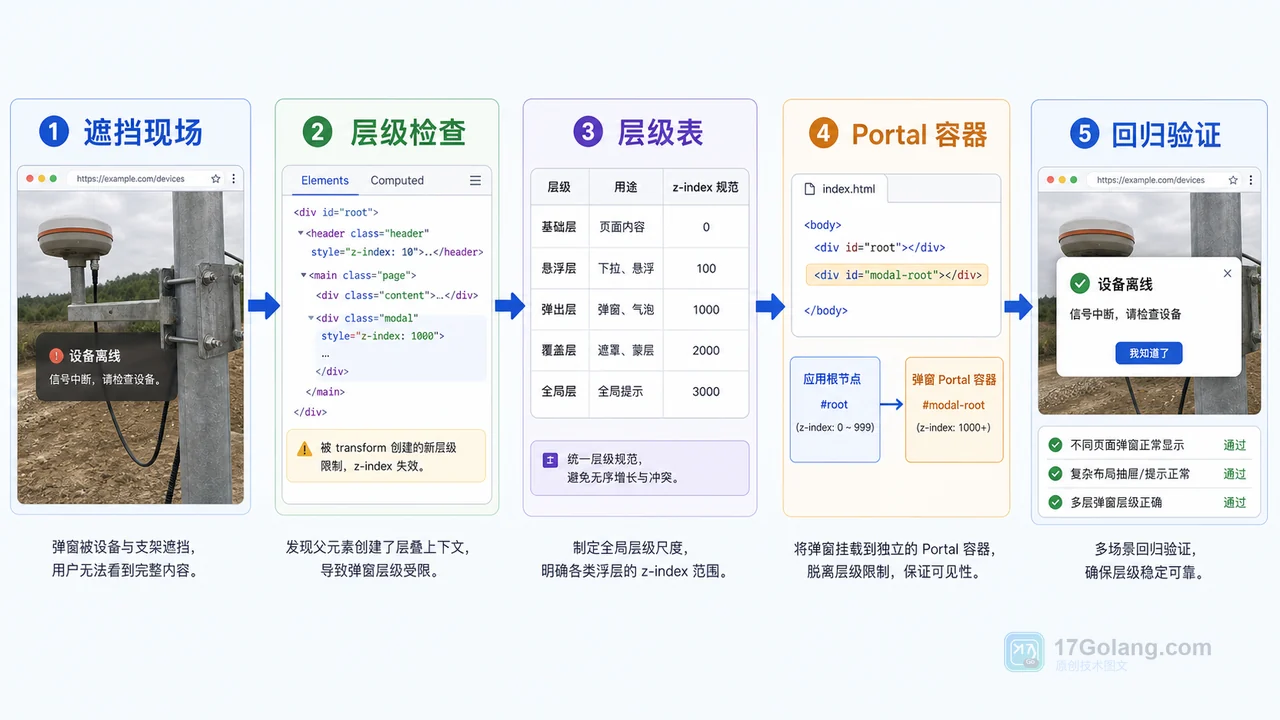
- 前端弹窗层级治理工作流:从 z-index 混乱到 Portal 容器规范
- 350浏览 收藏
-
- 文章 · 前端 | 5天前 | 前端 · javascript · URL参数 · 列表筛选 · 页面状态 · 前端 筛选条件 列表页 history.replaceState URLSearchParams 刷新还原
- 前端筛选条件刷新后丢失怎么办:从内存状态到 URL 参数一步步排查
- 348浏览 收藏

-

- 前端进阶之JavaScript设计模式
- 设计模式是开发人员在软件开发过程中面临一般问题时的解决方案,代表了最佳的实践。本课程的主打内容包括JS常见设计模式以及具体应用场景,打造一站式知识长龙服务,适合有JS基础的同学学习。
- 543次学习
-

- GO语言核心编程课程
- 本课程采用真实案例,全面具体可落地,从理论到实践,一步一步将GO核心编程技术、编程思想、底层实现融会贯通,使学习者贴近时代脉搏,做IT互联网时代的弄潮儿。
- 516次学习
-

- 简单聊聊mysql8与网络通信
- 如有问题加微信:Le-studyg;在课程中,我们将首先介绍MySQL8的新特性,包括性能优化、安全增强、新数据类型等,帮助学生快速熟悉MySQL8的最新功能。接着,我们将深入解析MySQL的网络通信机制,包括协议、连接管理、数据传输等,让
- 500次学习
-

- JavaScript正则表达式基础与实战
- 在任何一门编程语言中,正则表达式,都是一项重要的知识,它提供了高效的字符串匹配与捕获机制,可以极大的简化程序设计。
- 487次学习
-

- 从零制作响应式网站—Grid布局
- 本系列教程将展示从零制作一个假想的网络科技公司官网,分为导航,轮播,关于我们,成功案例,服务流程,团队介绍,数据部分,公司动态,底部信息等内容区块。网站整体采用CSSGrid布局,支持响应式,有流畅过渡和展现动画。
- 485次学习
-

- ljg-skills
- ljg-skills 是李继刚开源的 AI 技能与提示词集合,面向大模型使用者整理了一批可复用的 prompt、角色设定和任务技能模板,适合用于学习提示词设计、搭建个人 AI 工作流和沉淀团队常用智能体能力。
- 1147次使用
-

- MELO音乐
- MELO音乐是一站式AI视频与音乐制作助手,对标suno, udio的高品质体验。提供伴奏生成、原创写词、无损导出、哼唱识曲、混音变声等全套音频与短视频编辑工具。无论是流行Kpop、电音说唱、民谣古风、摇滚儿歌还是商用轻音乐,MELO为你免费谱曲,轻松做同款!
- 1103次使用
-

- UniScribe
- UniScribe 是一款 AI 音视频转文字与内容整理工具,支持上传音频、视频文件或粘贴 YouTube 链接,自动生成转写文本、摘要、思维导图和关键问题,并支持多格式导出,适合会议记录、课程学习、访谈整理和内容创作复盘。
- 1042次使用
-

- 剧云
- 剧云是专业中文剧本创作平台,安全稳定运行十余年,集成AI编剧、剧本医生审核、人物小传、剧情关系图、大纲编写、多人协作、Word导入导出、版权管控功能,数据安全防护,轻松高效创作剧本。
- 1227次使用
-

- 万象有声
- 万象有声,一个专为有声创作者打造的新一代智能有声内容创作平台。平台提供专业的智能拆章、智能画本编辑、AI配音、AI生成音效、后期制作、智能对轨、智能审听等有声创作全流程工具,可以帮助创作者高效、低成本创作出引人入胜的有声作品。立即体验,让有声书制作更简单!
- 1221次使用
-
- JavaScript函数定义及示例详解
- 2025-05-11 502浏览
-
- 优化用户界面体验的秘密武器:CSS开发项目经验大揭秘
- 2023-11-03 501浏览
-
- 使用微信小程序实现图片轮播特效
- 2023-11-21 501浏览
-
- 解析sessionStorage的存储能力与限制
- 2024-01-11 501浏览
-
- 探索冒泡活动对于团队合作的推动力
- 2024-01-13 501浏览