centos6.7 系统安装配置 mysql 数据库并配置远程访问
编程并不是一个机械性的工作,而是需要有思考,有创新的工作,语法是固定的,但解决问题的思路则是依靠人的思维,这就需要我们坚持学习和更新自己的知识。今天golang学习网就整理分享《centos6.7 系统安装配置 mysql 数据库并配置远程访问》,文章讲解的知识点主要包括MySQL、centos6.7、远程部署,如果你对数据库方面的知识点感兴趣,就不要错过golang学习网,在这可以对大家的知识积累有所帮助,助力开发能力的提升。
这里我们所说的安装 mysql 实际上是指安装 mysql-server ,就是mysql的服务端,mysql 客户端一般在 我们的系统里已经安装好了,并不需要再次安装了。不过我们也可以在安装 mysql-server 时重新安装 mysql 客户端
使用yum命令安装mysql
使用命令
yum list | grep mysql查看
yum上可用的 mysql 数据库版本。
yum list | grep mysql
yum list mysql-server
使用
yum install mysql-server安装mysql服务端
➜  ~ yum install mysql-server

...此处省略一万字

总下载量:12 M
确定吗?[y/N]:y
下载软件包:
(1/5): mysql-5.1.73-7.el6.i686.rpm                | 904 kB     00:00
(2/5): mysql-libs-5.1.73-7.el6.i686.rpm           | 1.2 MB     00:00
(3/5): mysql-server-5.1.73-7.el6.i686.rpm         | 8.8 MB     00:00
(4/5): perl-DBD-MySQL-4.013-3.el6.i686.rpm        | 134 kB     00:00
(5/5): perl-DBI-1.609-4.el6.i686.rpm              | 705 kB     00:00
-------------------------------------------------------------------------
总计                                      22 MB/s |  12 MB     00:00
运行 rpm_check_debug
执行事务测试
事务测试成功
执行事务
  正在升级   : mysql-libs-5.1.73-7.el6.i686                          1/6
  正在安装   : perl-DBI-1.609-4.el6.i686                             2/6
  正在安装   : perl-DBD-MySQL-4.013-3.el6.i686                       3/6
  正在安装   : mysql-5.1.73-7.el6.i686                               4/6
  正在安装   : mysql-server-5.1.73-7.el6.i686                        5/6
  清理       : mysql-libs-5.1.73-5.el6_6.i686                        6/6
  Verifying  : perl-DBD-MySQL-4.013-3.el6.i686                       1/6
  Verifying  : mysql-server-5.1.73-7.el6.i686                        2/6
  Verifying  : perl-DBI-1.609-4.el6.i686                             3/6
  Verifying  : mysql-libs-5.1.73-7.el6.i686                          4/6
  Verifying  : mysql-5.1.73-7.el6.i686                               5/6
  Verifying  : mysql-libs-5.1.73-5.el6_6.i686                        6/6

已安装:
  mysql-server.i686 0:5.1.73-7.el6

作为依赖被安装:
  mysql.i686 0:5.1.73-7.el6        perl-DBD-MySQL.i686 0:4.013-3.el6
  perl-DBI.i686 0:1.609-4.el6

作为依赖被升级:
  mysql-libs.i686 0:5.1.73-7.el6

完毕!
到这里就安装完成了
启动 mysql 服务
当我们第一次启动 mysql 数据库时,会进行一系列的初始化配置,输出如下内容
➜  ~ service mysqld start
Initializing MySQL database:  Installing MySQL system tables...
OK
Filling help tables...
OK

To start mysqld at boot time you have to copy
support-files/mysql.server to the right place for your system

PLEASE REMEMBER TO SET A PASSWORD FOR THE MySQL root USER !
To do so, start the server, then issue the following commands:

/usr/bin/mysqladmin -u root password 'new-password'
/usr/bin/mysqladmin -u root -h VM_176_3_centos password 'new-password'

Alternatively you can run:
/usr/bin/mysql_secure_installation

which will also give you the option of removing the test
databases and anonymous user created by default.  This is
strongly recommended for production servers.

See the manual for more instructions.

You can start the MySQL daemon with:
cd /usr ; /usr/bin/mysqld_safe &

You can test the MySQL daemon with mysql-test-run.pl
cd /usr/mysql-test ; perl mysql-test-run.pl

Please report any problems with the /usr/bin/mysqlbug script!

                                                           [  OK  ]
Starting mysqld:                                           [  OK  ]
这时, mysql 数据库就启动成功了,第二次启动数据库的时候 就不会再输出这么多内容了。
重启 mysql 数据库
重启数据库可以使用以下命令:
➜  ~ service mysqld restart
Stopping mysqld:                                           [  OK  ]
Starting mysqld:                                           [  OK  ]
设置开机自启
数据库启动成功后,设置 mysql 开机自启动
➜ ~ chkconfig mysqld on
可以通过
chkconfig --list | grep mysql命令查看 mysql 数据库是否是开机自启动
➜  ~ chkconfig --list | grep mysql
mysqld             0:关闭    1:关闭    2:启用    3:启用    4:启用    5:启用    6:关闭
注意:
chkconfig --list可以查看服务器中 所有服务的自启动状态
设置 mysql 的密码
mysql数据库安装完以后只有一个root管理员账号,但是此时的root账号还没有为其设置密码,这时回头看一下在第一次启动mysql服务时,输出的一大段信息中,我们看到有这样一行信息 :
/usr/bin/mysqladmin -u root password 'new-password' // 为root账号设置密码
所以我们可以通过 该命令来给我们的root账号设置密码(注意:这个root账号是mysql的root账号,非Linux的root账号)
➜ ~ mysqladmin -u root password '123456' // 通过该命令给root账号设置密码为 123456
然后就可以通过
mysql -u root -p命令来登录 mysql 数据库了
➜  ~ mysql -u root -p
Enter password:
Welcome to the MySQL monitor.  Commands end with ; or \g.
Your MySQL connection id is 4
Server version: 5.1.73 Source distribution

Copyright (c) 2000, 2013, Oracle and/or its affiliates. All rights reserved.

Oracle is a registered trademark of Oracle Corporation and/or its
affiliates. Other names may be trademarks of their respective
owners.

Type 'help;' or '\h' for help. Type '\c' to clear the current input statement.

mysql> show databases;
+--------------------+
| Database           |
+--------------------+
| information_schema |
| mysql              |
| test               |
+--------------------+
3 rows in set (0.00 sec)

mysql> exit;
Bye
查看安装好的 mysql-server 版本
使用
rpm -qi mysql-server命令查看安装好的 mysql-server 版本信息
➜  ~ rpm -qi mysql-server
Name        : mysql-server                 Relocations: (not relocatable)
Version     : 5.1.73                            Vendor: CentOS
Release     : 7.el6                         Build Date: 2016年05月11日 星期三 14时05分53秒
Install Date: 2016年10月08日 星期六 14时49分09秒      Build Host: worker1.bsys.centos.org
Group       : Applications/Databases        Source RPM: mysql-5.1.73-7.el6.src.rpm
Size        : 25688915                         License: GPLv2 with exceptions
Signature   : RSA/SHA1, 2016年05月12日 星期四 18时46分25秒, Key ID 0946fca2c105b9de
Packager    : CentOS BuildSystem <http:>
URL         : http://www.mysql.com
Summary     : The MySQL server and related files
Description :
MySQL is a multi-user, multi-threaded SQL database server. MySQL is a
client/server implementation consisting of a server daemon (mysqld)
and many different client programs and libraries. This package contains
the MySQL server and some accompanying files and directories.</http:>
卸载 mysql mysql-server
我们可以通过如下命令来查看我们的系统上是否 安装了 mysql
➜  ~ rpm -qa | grep mysql
mysql-5.1.73-7.el6.i686
mysql-libs-5.1.73-7.el6.i686
mysql-server-5.1.73-7.el6.i686
通过
rpm -e命令 或者
rpm -e --nodeps命令来卸载掉
➜  ~ rpm -qa | grep mysql
mysql-5.1.73-7.el6.i686
mysql-libs-5.1.73-7.el6.i686
mysql-server-5.1.73-7.el6.i686
➜  ~ rpm -e mysql
error: Failed dependencies:
    mysql = 5.1.73-7.el6 is needed by (installed) mysql-server-5.1.73-7.el6.i686
➜  ~ rpm -e --nodeps mysql
➜  ~ rpm -qa | grep mysql
mysql-libs-5.1.73-7.el6.i686
mysql-server-5.1.73-7.el6.i686
如上面的所示,当执行
rpm -e mysql时会因为依赖关系 而出现错误,所以可以使用
rpm -e --nodeps mysql来强制卸载,执行完之后 再查看安装的
mysql发现少了
mysql-5.1.73-7.el6.i686。
如果想全部卸载,再次执行
➜  ~ rpm -e --nodeps mysql-libs
➜  ~ rpm -e --nodeps mysql-server
即可。
mysql 的配置文件
mysql 的配置文件 保存在 /etc/my.cnf
中
我们可以看一下 内容:
➜  ~ cat /etc/my.cnf
[mysqld]
datadir=/var/lib/mysql
socket=/var/lib/mysql/mysql.sock
user=mysql
# Disabling symbolic-links is recommended to prevent assorted security risks
symbolic-links=0

[mysqld_safe]
log-error=/var/log/mysqld.log
pid-file=/var/run/mysqld/mysqld.pid
mysql 的数据库文件
mysql 的数据库文件存放路径为:
/var/lib/mysql
➜  ~ ls -l /var/lib/mysql
总用量 20528
-rw-rw---- 1 mysql mysql 10485760 10月  8 15:11 ibdata1
-rw-rw---- 1 mysql mysql  5242880 10月  8 15:11 ib_logfile0
-rw-rw---- 1 mysql mysql  5242880 10月  8 14:50 ib_logfile1
drwx------ 2 mysql mysql     4096 10月  8 14:49 mysql
srwxrwxrwx 1 mysql mysql        0 10月  8 15:11 mysql.sock
drwx------ 2 mysql mysql     4096 10月  8 14:49 test
mysql 的日志输出文件
mysql数据库的日志输出存放位置在
/var/log这个目录下
➜  ~ ls /var/log
anaconda.ifcfg.log    anaconda.yum.log  dmesg       messages    spooler
anaconda.log          audit             dmesg.old   mysqld.log  tallylog
anaconda.program.log  boot.log          dracut.log  ntpstats    wtmp
anaconda.storage.log  btmp              lastlog     prelink     yum.log
anaconda.syslog       cron              maillog     secure
其中mysqld.log 这个文件就是mysql数据库产生的一些日志信息,通过查看该日志文件,我们可以从中获得很多信息
查看监听端口
mysql 的服务端口为 3306 ,我们可以使用
netstat -anp命令来查看系统是否在监听这个端口
➜  ~ netstat -anp
Active Internet connections (servers and established)
Proto Recv-Q Send-Q Local Address               Foreign Address             State       PID/Program name
tcp        0      0 0.0.0.0:3306                0.0.0.0:*                   LISTEN      3513/mysqld
设置 mysql 的远程访问
经过上面的设置后,还不能进行远程访问,连接的时候如下图所示:
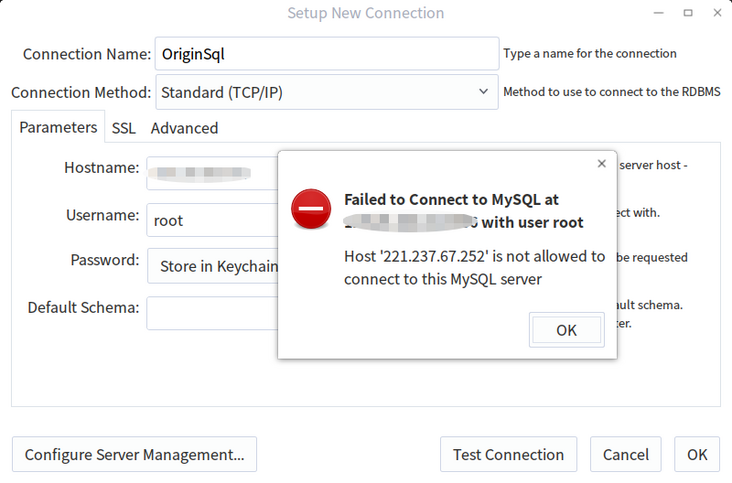
解决办法
首先登录
mysql数据库,然后使用命令
grant all privileges on *.* to 'root'@'%' identified by '123456' with grant option;配置远程访问:
➜  ~ mysql -u root -p
Enter password:
Welcome to the MySQL monitor.  Commands end with ; or \g.
Your MySQL connection id is 8
Server version: 5.1.73 Source distribution

Copyright (c) 2000, 2013, Oracle and/or its affiliates. All rights reserved.

Oracle is a registered trademark of Oracle Corporation and/or its
affiliates. Other names may be trademarks of their respective
owners.

Type 'help;' or '\h' for help. Type '\c' to clear the current input statement.

mysql> grant all privileges on *.* to 'root'@'%' identified by '123456' with grant option;
Query OK, 0 rows affected (0.00 sec)

mysql> exit;
Bye
➜  ~
再次测试,就OK了。
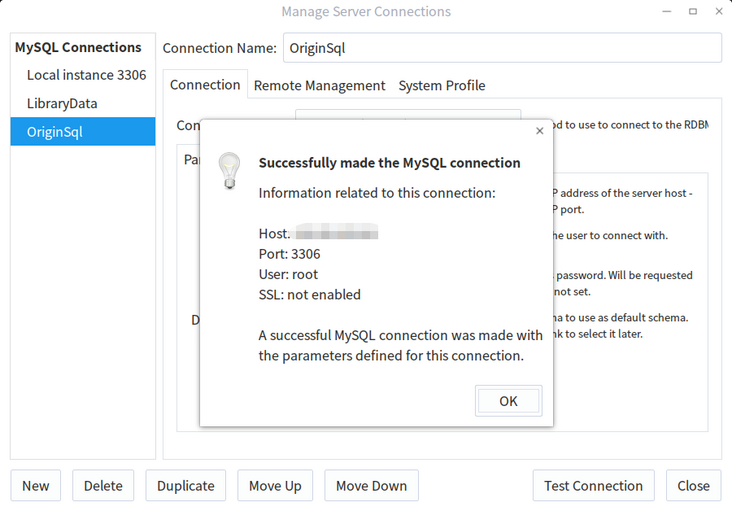
至此,所有的安装配置都完成了,如有纰漏,请及时告知,谢谢~~
今天带大家了解了MySQL、centos6.7、远程部署的相关知识,希望对你有所帮助;关于数据库的技术知识我们会一点点深入介绍,欢迎大家关注golang学习网公众号,一起学习编程~
 MySQL 服务无法打开的解决方法
- 上一篇
- MySQL 服务无法打开的解决方法

- 下一篇
- Sequelize Model
-

- 数据库 · MySQL | 3天前 | mysql 范式
- MySQL数据库范式有哪些?
- 271浏览 收藏
-

- 数据库 · MySQL | 4天前 |
- MySQL连接管理及连接池优化方法
- 338浏览 收藏
-
- 数据库 · MySQL | 6天前 |
- MySQL基础命令大全新手入门必看
- 419浏览 收藏
-

- 数据库 · MySQL | 1星期前 |
- MySQL多表连接查询技巧与方法
- 119浏览 收藏
-
- 数据库 · MySQL | 2星期前 |
- MySQL增删改查操作详解
- 127浏览 收藏
-
- 数据库 · MySQL | 2星期前 |
- MySQL权限管理与设置全攻略
- 137浏览 收藏
-
- 数据库 · MySQL | 2星期前 |
- MySQL权限管理设置全攻略
- 473浏览 收藏
-

- 数据库 · MySQL | 2星期前 |
- MySQL查询缓存配置与作用解析
- 140浏览 收藏
-

- 数据库 · MySQL | 2星期前 |
- MySQLwhere条件筛选全解析
- 252浏览 收藏
-

- 数据库 · MySQL | 3星期前 |
- MySQLIF函数详解与使用示例
- 434浏览 收藏
-

- 数据库 · MySQL | 3星期前 |
- mysql数据库基础命令 新手必学的mysql操作指令合集
- 233浏览 收藏
-

- 数据库 · MySQL | 3星期前 | mysql 聚合函数
- mysql数据库中聚合函数的功能_mysql数据库中统计函数的作用
- 385浏览 收藏
-

- 前端进阶之JavaScript设计模式
- 设计模式是开发人员在软件开发过程中面临一般问题时的解决方案,代表了最佳的实践。本课程的主打内容包括JS常见设计模式以及具体应用场景,打造一站式知识长龙服务,适合有JS基础的同学学习。
- 543次学习
-

- GO语言核心编程课程
- 本课程采用真实案例,全面具体可落地,从理论到实践,一步一步将GO核心编程技术、编程思想、底层实现融会贯通,使学习者贴近时代脉搏,做IT互联网时代的弄潮儿。
- 516次学习
-

- 简单聊聊mysql8与网络通信
- 如有问题加微信:Le-studyg;在课程中,我们将首先介绍MySQL8的新特性,包括性能优化、安全增强、新数据类型等,帮助学生快速熟悉MySQL8的最新功能。接着,我们将深入解析MySQL的网络通信机制,包括协议、连接管理、数据传输等,让
- 500次学习
-

- JavaScript正则表达式基础与实战
- 在任何一门编程语言中,正则表达式,都是一项重要的知识,它提供了高效的字符串匹配与捕获机制,可以极大的简化程序设计。
- 487次学习
-

- 从零制作响应式网站—Grid布局
- 本系列教程将展示从零制作一个假想的网络科技公司官网,分为导航,轮播,关于我们,成功案例,服务流程,团队介绍,数据部分,公司动态,底部信息等内容区块。网站整体采用CSSGrid布局,支持响应式,有流畅过渡和展现动画。
- 485次学习
-

- ChatExcel酷表
- ChatExcel酷表是由北京大学团队打造的Excel聊天机器人,用自然语言操控表格,简化数据处理,告别繁琐操作,提升工作效率!适用于学生、上班族及政府人员。
- 3636次使用
-

- Any绘本
- 探索Any绘本(anypicturebook.com/zh),一款开源免费的AI绘本创作工具,基于Google Gemini与Flux AI模型,让您轻松创作个性化绘本。适用于家庭、教育、创作等多种场景,零门槛,高自由度,技术透明,本地可控。
- 3889次使用
-

- 可赞AI
- 可赞AI,AI驱动的办公可视化智能工具,助您轻松实现文本与可视化元素高效转化。无论是智能文档生成、多格式文本解析,还是一键生成专业图表、脑图、知识卡片,可赞AI都能让信息处理更清晰高效。覆盖数据汇报、会议纪要、内容营销等全场景,大幅提升办公效率,降低专业门槛,是您提升工作效率的得力助手。
- 3842次使用
-

- 星月写作
- 星月写作是国内首款聚焦中文网络小说创作的AI辅助工具,解决网文作者从构思到变现的全流程痛点。AI扫榜、专属模板、全链路适配,助力新人快速上手,资深作者效率倍增。
- 5008次使用
-

- MagicLight
- MagicLight.ai是全球首款叙事驱动型AI动画视频创作平台,专注于解决从故事想法到完整动画的全流程痛点。它通过自研AI模型,保障角色、风格、场景高度一致性,让零动画经验者也能高效产出专业级叙事内容。广泛适用于独立创作者、动画工作室、教育机构及企业营销,助您轻松实现创意落地与商业化。
- 4213次使用
-
- golang MySQL实现对数据库表存储获取操作示例
- 2022-12-22 499浏览
-
- 搞一个自娱自乐的博客(二) 架构搭建
- 2023-02-16 244浏览
-
- B-Tree、B+Tree以及B-link Tree
- 2023-01-19 235浏览
-
- mysql面试题
- 2023-01-17 157浏览
-
- MySQL数据表简单查询
- 2023-01-10 101浏览


