useReducer 以及它与 useState 的不同之处
有志者,事竟成!如果你在学习文章,那么本文《useReducer 以及它与 useState 的不同之处》,就很适合你!文章讲解的知识点主要包括,若是你对本文感兴趣,或者是想搞懂其中某个知识点,就请你继续往下看吧~
目录
- 简介
- 何时使用 usestate
- 何时使用 usereducer
- 示例 1:带有 usestate 的计数器应用
- 示例 2:使用 usereducer 的计数器应用
- 示例 3:使用 usereducer 处理表单输入
- 示例 4:使用 usereducer 构建测验应用程序
- usestate 和 usereducer 的比较
- 结论
介绍
react 提供了两个用于管理状态的关键钩子:usestate 和 usereducer。虽然两者都旨在处理功能组件中的状态,但它们用于不同的场景。本文探讨了两者之间的差异,并重点介绍了何时应该使用它们,并举例说明了如何更好地理解
何时使用 usestate
usestate 是一个简单而有效的钩子,用于在以下情况下处理本地状态:
- 您需要管理简单的状态(如布尔值、数字或字符串)。
- 您希望通过最少的设置直接更新状态。
- 状态没有复杂的转换或对多个变量的依赖。
基本语法
const [state, setstate] = usestate(initialstate);
- 状态:当前状态。
- setstate:更新状态的函数。
- initialstate:初始状态
何时使用 usereducer
usereducer 在以下情况下很有用:
- 你有复杂的状态逻辑。
- 多个状态更新相互依赖。
基本语法
const [state, dispatch] = usereducer(reducer, initialstate);
- 状态:当前状态。
- dispatch:向reducer发送动作以触发状态更新的函数。
- reducer:reducer 是一个纯函数,它接受两个参数:当前状态和操作。 它根据操作返回新状态。
基本语法
const reducer = (state, action) => {
    switch (action.type) {
        case 'increment':
            return { count: state.count + 1 };
        case 'decrement':
            return { count: state.count - 1 };
        default:
            return state;
    }
}
动作:动作是一个描述应该发生什么变化的对象
它通常具有 type 属性和可选的 payload.
类型告诉reducer要进行什么样的状态改变。
有效负载携带更改所需的任何附加数据。initialstate:初始状态,就像usestate中的initialstate。
示例 1 带有 usestate 的计数器应用程序
import react, { usestate } from 'react';
export default function counter() {
const [count, setcount] = usestate(0);
return (
count: {count}
);
}
解释
- 我们使用 usestate 来跟踪计数值。
- 我们有两个按钮:一个用于增加计数状态,一个用于减少计数状态。
- 直接使用setcount函数更新状态。
示例 2:带有 usereducer 的计数器应用程序
import react, { usereducer } from 'react';
function reducer(state, action) {
switch (action.type) {
case 'increment':
return { count: state.count + 1 };
case 'decrement':
return { count: state.count - 1 };
default:
return state;
}
}
export default function counter() {
const [state, dispatch] = usereducer(reducer, { count: 0 });
return (
count: {state.count}
);
}
解释
- reducer 函数控制状态应如何根据分派的操作进行更改。
- 我们不直接设置状态,而是调度操作(递增、递减)来触发更改。
示例 3:使用 usereducer 处理表单输入
让我们将概念扩展到处理具有多个输入字段的表单。此场景非常适合 usereducer,因为它根据操作更新多个状态属性。
import react, { usereducer } from 'react';

const initialstate = {
  name: '',
  email: ''
};

function reducer(state, action) {
  switch (action.type) {
    case 'setname':
      return { ...state, name: action.payload };
    case 'setemail':
      return { ...state, email: action.payload };
    default:
      return state;
  }
}

export default function form() {
  const [state, dispatch] = usereducer(reducer, initialstate);

  return (

       dispatch({ type: 'setname', payload: e.target.value })}
        placeholder="name"
      />
       dispatch({ type: 'setemail', payload: e.target.value })}
        placeholder="email"
      />
      name: {state.name}
      email: {state.email}

  );
}
解释
- reducer 通过根据操作的类型更新不同的属性(名称、电子邮件)来管理表单状态。
- dispatch 将操作发送到reducer 以更新状态。有效负载携带数据(例如输入值)。
示例 4:使用 usereducer 构建测验应用程序
注意:样式是使用 tailwindcss 完成的
import react, { usereducer } from 'react';
// quiz data with detailed explanations
const quizdata = [
{
question: "what hook is used to handle complex state logic in react?",
options: ["usestate", "usereducer", "useeffect", "usecontext"],
correct: 1,
explanation: "usereducer is specifically designed for complex state management scenarios."
},
{
question: "which function updates the state in usereducer?",
options: ["setstate", "dispatch", "update", "setreducer"],
correct: 1,
explanation: "dispatch is the function provided by usereducer to trigger state updates."
},
{
question: "what pattern is usereducer based on?",
options: ["observer pattern", "redux pattern", "factory pattern", "module pattern"],
correct: 1,
explanation: "usereducer is inspired by redux's state management pattern."
}
];
// initial state with feedback state added
const initialstate = {
currentquestion: 0,
score: 0,
showscore: false,
selectedoption: null,
showfeedback: false, // new state for showing answer feedback
};
// enhanced reducer with feedback handling
const reducer = (state, action) => {
switch (action.type) {
case 'select_option':
return {
...state,
selectedoption: action.payload,
showfeedback: true, // show feedback when option is selected
};
case 'next_question':
const iscorrect = action.payload === quizdata[state.currentquestion].correct;
const nextquestion = state.currentquestion + 1;
return {
...state,
score: iscorrect ? state.score + 1 : state.score,
currentquestion: nextquestion,
showscore: nextquestion === quizdata.length,
selectedoption: null,
showfeedback: false, // reset feedback for next question
};
case 'restart':
return initialstate;
default:
return state;
}
};
const quiz = () => {
const [state, dispatch] = usereducer(reducer, initialstate);
const { currentquestion, score, showscore, selectedoption, showfeedback } = state;
const handleoptionclick = (optionindex) => {
dispatch({ type: 'select_option', payload: optionindex });
};
const handlenext = () => {
if (selectedoption !== null) {
dispatch({ type: 'next_question', payload: selectedoption });
}
};
const handlerestart = () => {
dispatch({ type: 'restart' });
};
if (showscore) {
return (
quiz complete!
your score: {score} out of {quizdata.length}
);
}
const currentquizdata = quizdata[currentquestion];
const iscorrectanswer = (optionindex) => optionindex === currentquizdata.correct;
return (
question {currentquestion + 1}/{quizdata.length}
{currentquizdata.question}
{currentquizdata.options.map((option, index) => {
let buttonstyle = 'bg-gray-50 hover:bg-gray-100';
if (showfeedback && selectedoption === index) {
buttonstyle = iscorrectanswer(index)
? 'bg-green-100 border-2 border-green-500 text-green-700'
: 'bg-red-100 border-2 border-red-500 text-red-700';
}
return (
);
})}
{showfeedback && (
{iscorrectanswer(selectedoption)
? "correct! "
: `incorrect. the correct answer was: ${currentquizdata.options[currentquizdata.correct]}. `}
{currentquizdata.explanation}
)}
);
};
export default quiz;
解释
*usereducer 的初始状态
// initial state
const initialstate = {
  currentquestion: 0,
  score: 0,
  showscore: false,
  selectedoption: null,
  showfeedback: false, // new state for feedback
};
- 减速机功能
const reducer = (state, action) => {
  switch (action.type) {
    case 'select_option':
      return {
        ...state,
        selectedoption: action.payload,
        showfeedback: true, // show feedback immediately
      };
    case 'next_question':
      const iscorrect = action.payload === quizdata[state.currentquestion].correct;
      // ... rest of the logic
减速器处理三个动作:
- select_option:当用户选择答案时
- next_question:转到下一个问题时
- restart:重新开始测验时
造型逻辑
let buttonstyle = 'bg-gray-50 hover:bg-gray-100';

if (showfeedback && selectedoption === index) {
  buttonstyle = iscorrectanswer(index)
    ? 'bg-green-100 border-2 border-green-500 text-green-700'
    : 'bg-red-100 border-2 border-red-500 text-red-700';
}
此代码确定按钮样式:
- 默认:灰色背景
- 正确答案:绿色背景,绿色边框
- 错误答案:红色背景,红色边框
反馈显示
{showFeedback && (

    {isCorrectAnswer(selectedOption)
      ? "Correct! "
      : `Incorrect. The correct answer was: ${currentQuizData.options[currentQuizData.correct]}. `}
    {currentQuizData.explanation}

)}
这显示了选择答案后的反馈:
*显示答案是否正确
*如果错误则显示正确答案
*包括解释
测验应用程序的托管链接
usestate 和 usereducer 的比较
| feature | usestate | usereducer |
|---|---|---|
| best for | simple state | complex state logic |
| state management | direct, using setstate | managed through a reducer function |
| boilerplate code | minimal | requires more setup |
| state update | inline with setstate | managed by dispatch and reducer |
结论
usestate 和 usereducer 都是用于管理功能组件中状态的强大钩子。 usestate 最适合简单状态,而 usereducer 在处理状态更新密切相关的更复杂场景时表现出色。选择正确的状态取决于您需要管理的状态的复杂性。
到这里,我们也就讲完了《useReducer 以及它与 useState 的不同之处》的内容了。个人认为,基础知识的学习和巩固,是为了更好的将其运用到项目中,欢迎关注golang学习网公众号,带你了解更多关于的知识点!
 移动端银行应用中如何实现Canvas签字按力度调控笔触粗细?
- 上一篇
- 移动端银行应用中如何实现Canvas签字按力度调控笔触粗细?

- 下一篇
- ## Sequelize 时间戳不准确?如何解决?
-
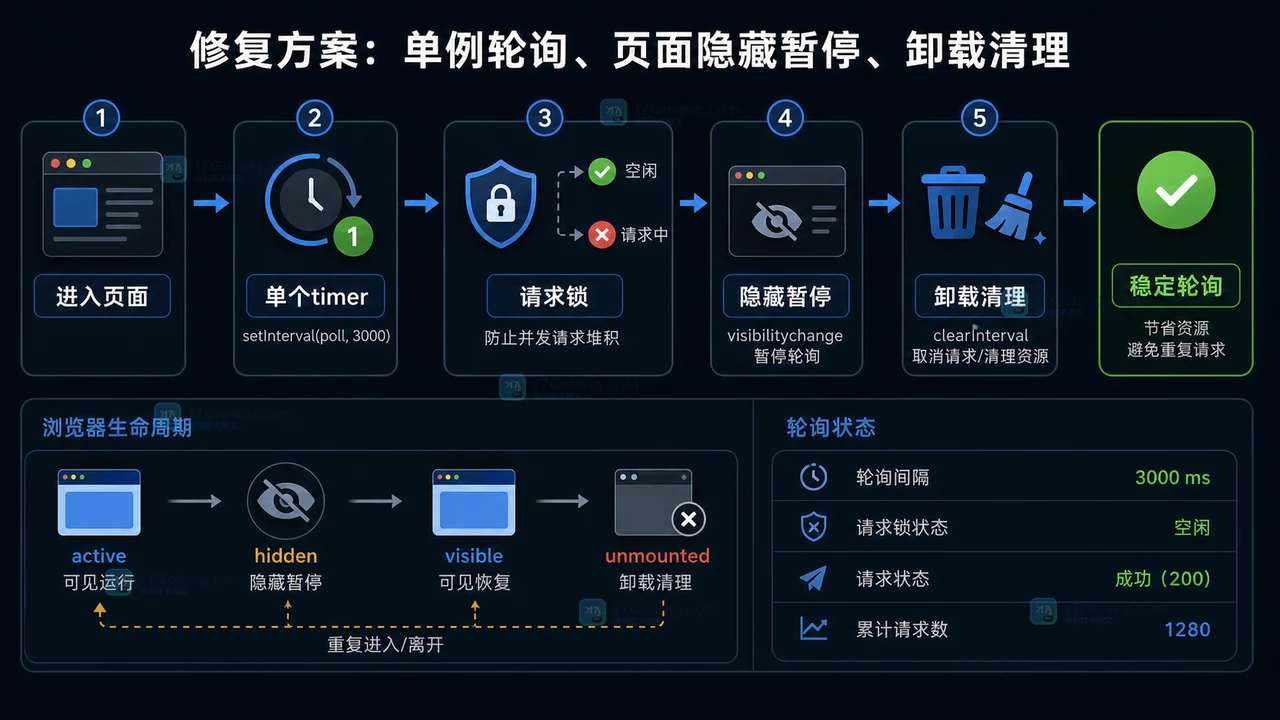
- 文章 · 前端 | 6天前 | 定时器 · 前端 · 性能排查 · 接口请求 · 轮询 · setInterval · setInterval 页面可见性 clearInterval 前端轮询 请求堆积 定时器清理
- 前端轮询接口越打越多怎么办:从重复定时器到清理机制一步步排查
- 490浏览 收藏
-
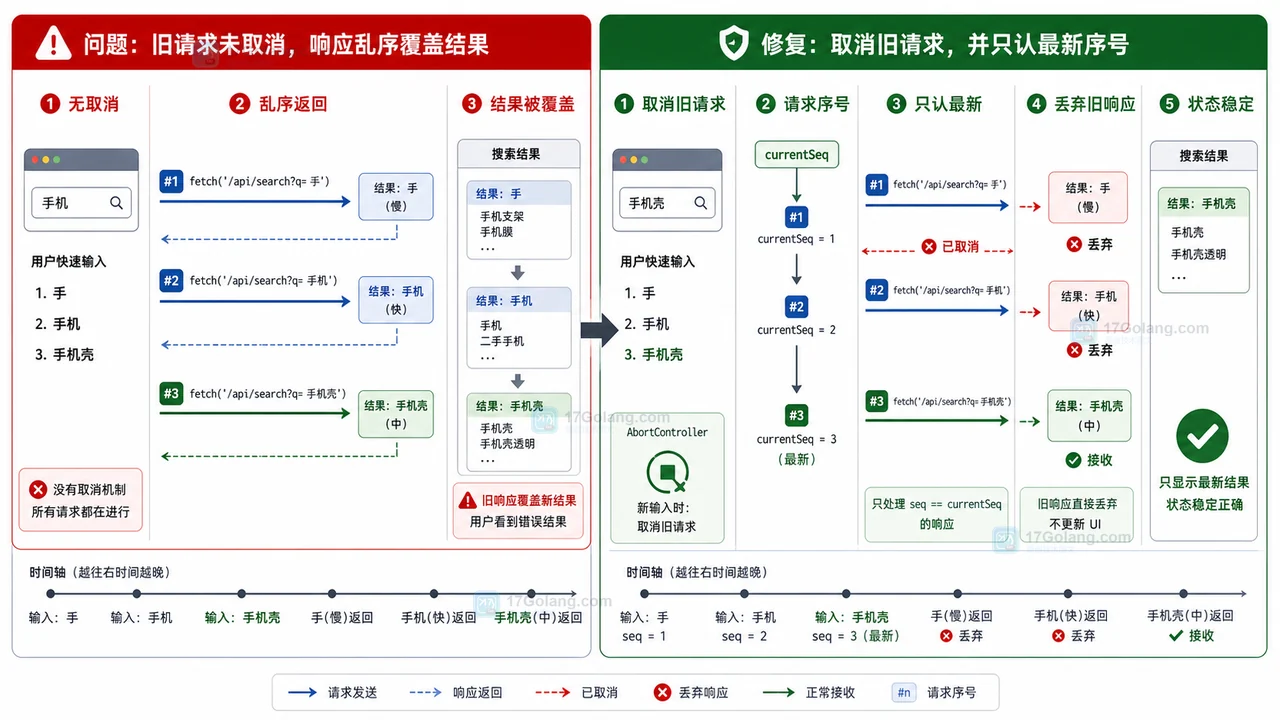
- 文章 · 前端 | 6天前 | 前端 · 搜索框 · AbortController · 接口请求 · 状态管理 · Fetch AbortController 前端搜索 请求乱序 旧响应覆盖
- 前端搜索结果倒退怎么办:AbortController 取消旧请求和序号兜底
- 295浏览 收藏
-
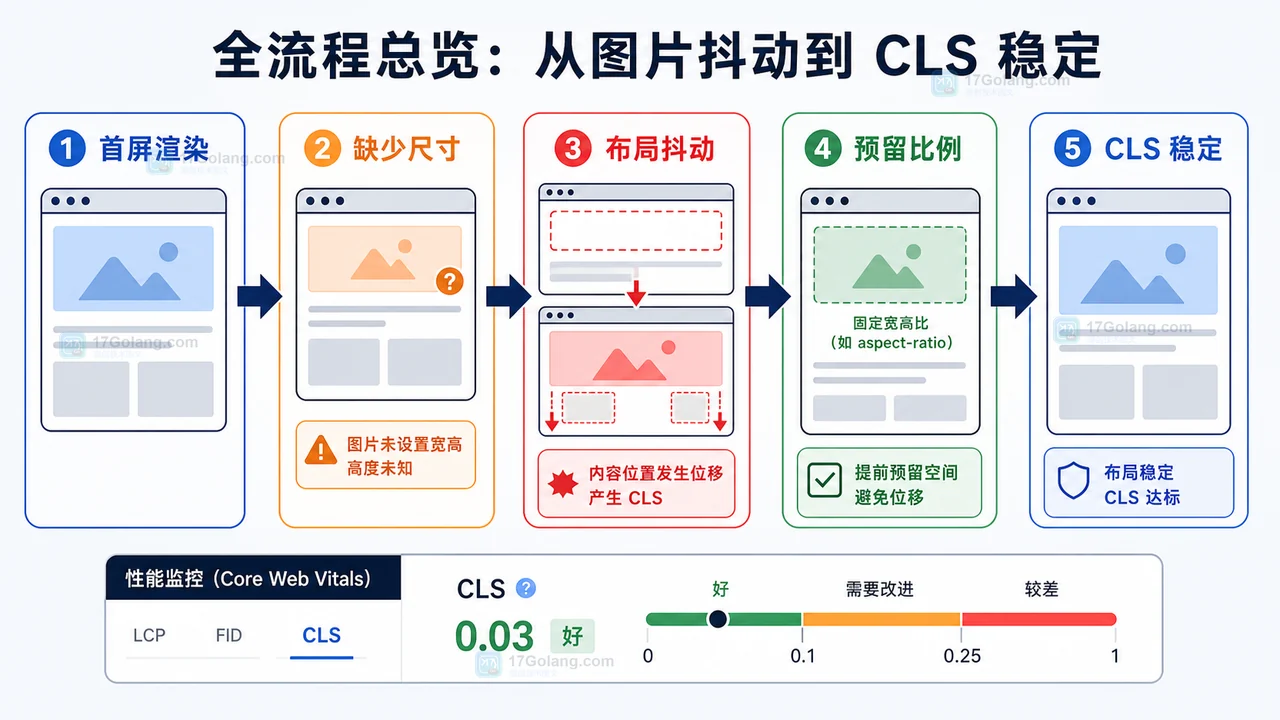
- 文章 · 前端 | 6天前 | 前端 · 性能优化 · cls · 懒加载 · Core Web Vitals · 前端 图片懒加载 IntersectionObserver CLS 布局稳定
- 前端图片懒加载布局抖动治理完整流程:占位比例、按需加载和 CLS 复查
- 128浏览 收藏
-
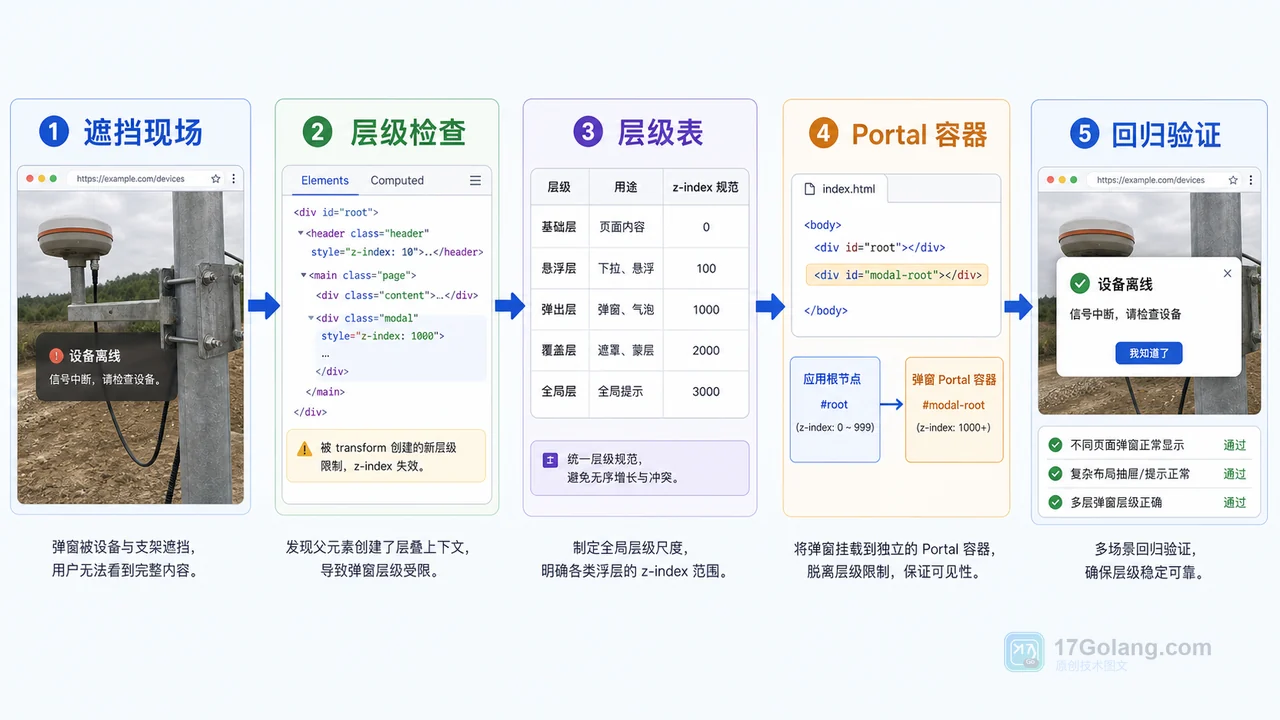
- 文章 · 前端 | 1星期前 | 工程化 · 前端 · javascript · css · 弹窗 · 前端 z-index 遮罩层 stacking context Portal 弹窗层级
- 前端弹窗层级治理工作流:从 z-index 混乱到 Portal 容器规范
- 350浏览 收藏


-

- 前端进阶之JavaScript设计模式
- 设计模式是开发人员在软件开发过程中面临一般问题时的解决方案,代表了最佳的实践。本课程的主打内容包括JS常见设计模式以及具体应用场景,打造一站式知识长龙服务,适合有JS基础的同学学习。
- 543次学习
-

- GO语言核心编程课程
- 本课程采用真实案例,全面具体可落地,从理论到实践,一步一步将GO核心编程技术、编程思想、底层实现融会贯通,使学习者贴近时代脉搏,做IT互联网时代的弄潮儿。
- 516次学习
-

- 简单聊聊mysql8与网络通信
- 如有问题加微信:Le-studyg;在课程中,我们将首先介绍MySQL8的新特性,包括性能优化、安全增强、新数据类型等,帮助学生快速熟悉MySQL8的最新功能。接着,我们将深入解析MySQL的网络通信机制,包括协议、连接管理、数据传输等,让
- 500次学习
-

- JavaScript正则表达式基础与实战
- 在任何一门编程语言中,正则表达式,都是一项重要的知识,它提供了高效的字符串匹配与捕获机制,可以极大的简化程序设计。
- 487次学习
-

- 从零制作响应式网站—Grid布局
- 本系列教程将展示从零制作一个假想的网络科技公司官网,分为导航,轮播,关于我们,成功案例,服务流程,团队介绍,数据部分,公司动态,底部信息等内容区块。网站整体采用CSSGrid布局,支持响应式,有流畅过渡和展现动画。
- 485次学习
-

- ljg-skills
- ljg-skills 是李继刚开源的 AI 技能与提示词集合,面向大模型使用者整理了一批可复用的 prompt、角色设定和任务技能模板,适合用于学习提示词设计、搭建个人 AI 工作流和沉淀团队常用智能体能力。
- 1509次使用
-

- MELO音乐
- MELO音乐是一站式AI视频与音乐制作助手,对标suno, udio的高品质体验。提供伴奏生成、原创写词、无损导出、哼唱识曲、混音变声等全套音频与短视频编辑工具。无论是流行Kpop、电音说唱、民谣古风、摇滚儿歌还是商用轻音乐,MELO为你免费谱曲,轻松做同款!
- 1448次使用
-

- UniScribe
- UniScribe 是一款 AI 音视频转文字与内容整理工具,支持上传音频、视频文件或粘贴 YouTube 链接,自动生成转写文本、摘要、思维导图和关键问题,并支持多格式导出,适合会议记录、课程学习、访谈整理和内容创作复盘。
- 1397次使用
-

- 剧云
- 剧云是专业中文剧本创作平台,安全稳定运行十余年,集成AI编剧、剧本医生审核、人物小传、剧情关系图、大纲编写、多人协作、Word导入导出、版权管控功能,数据安全防护,轻松高效创作剧本。
- 1584次使用
-

- 万象有声
- 万象有声,一个专为有声创作者打造的新一代智能有声内容创作平台。平台提供专业的智能拆章、智能画本编辑、AI配音、AI生成音效、后期制作、智能对轨、智能审听等有声创作全流程工具,可以帮助创作者高效、低成本创作出引人入胜的有声作品。立即体验,让有声书制作更简单!
- 1573次使用
-
- JavaScript函数定义及示例详解
- 2025-05-11 502浏览
-
- CSS变量简化按钮悬停效果技巧
- 2026-05-31 501浏览
-
- JavaScript符号类型详解与应用
- 2026-05-31 501浏览
-
- HTML剪贴板复制粘贴怎么用
- 2026-05-26 501浏览
-
- data-*属性详解:HTML数据存储与DOM操作技巧
- 2026-05-25 501浏览