从零搭建SpringBoot2.X整合Redis框架的详细教程
本篇文章给大家分享《从零搭建SpringBoot2.X整合Redis框架的详细教程》,覆盖了数据库的常见基础知识,其实一个语言的全部知识点一篇文章是不可能说完的,但希望通过这些问题,让读者对自己的掌握程度有一定的认识(B 数),从而弥补自己的不足,更好的掌握它。
最近也不知道写啥,看之前写过Kafka整合Springboot的文章,大家反响还挺热烈的,嘿嘿嘿,就感觉帮助到大家了还挺好的,也算是达到了自己的目的,正好,今天业务模块是springboot整合redis,因为之前做过,所以有现成的代码,cv一下之后就可以了,所以时间比较多,那就给大家整理一下Springboot整合Redis的代码实现吧,从项目搭建到源码实现,下面全都有,耐心看完,相信会对你有所帮助的
好了,话不多说,我们开始吧,同样的,还是建议能够自己在自己的PC端实现一下
个人公众号:Java架构师联盟,每日更新技术好文
一、使用Spring Initializr创建项目web项目
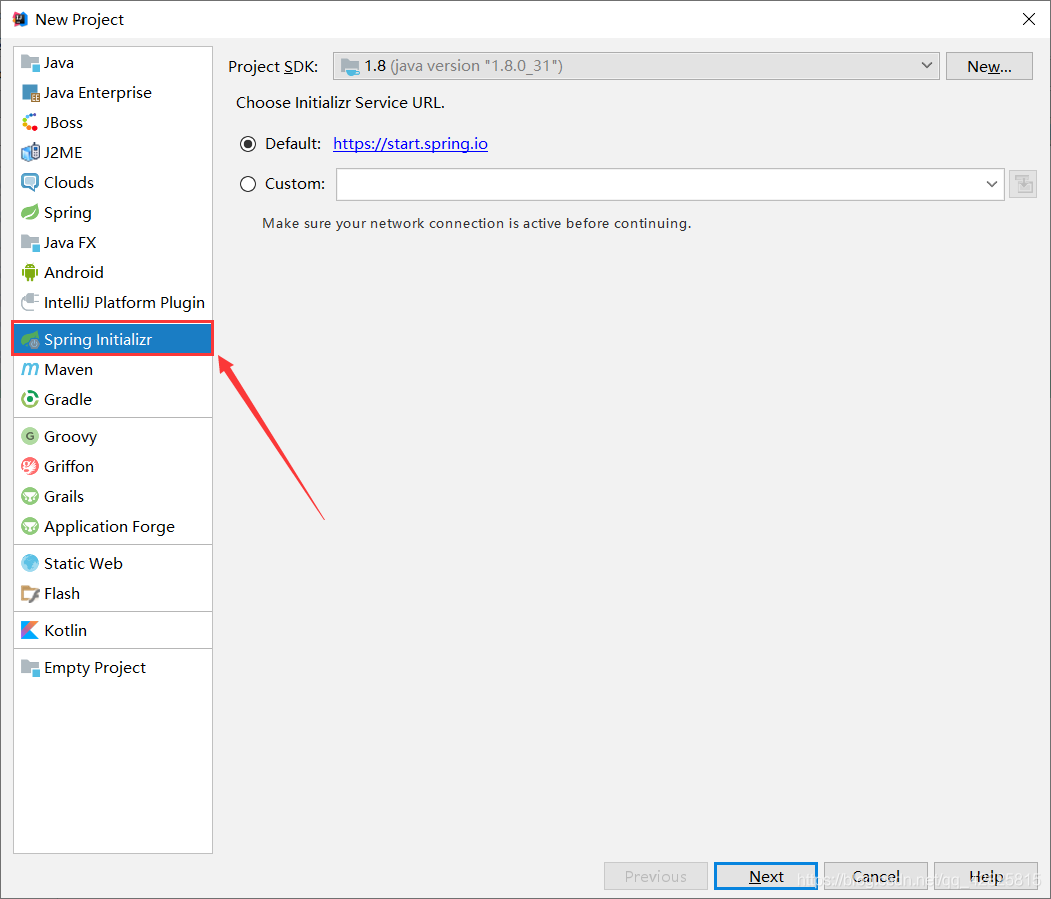
1、File→New→Project
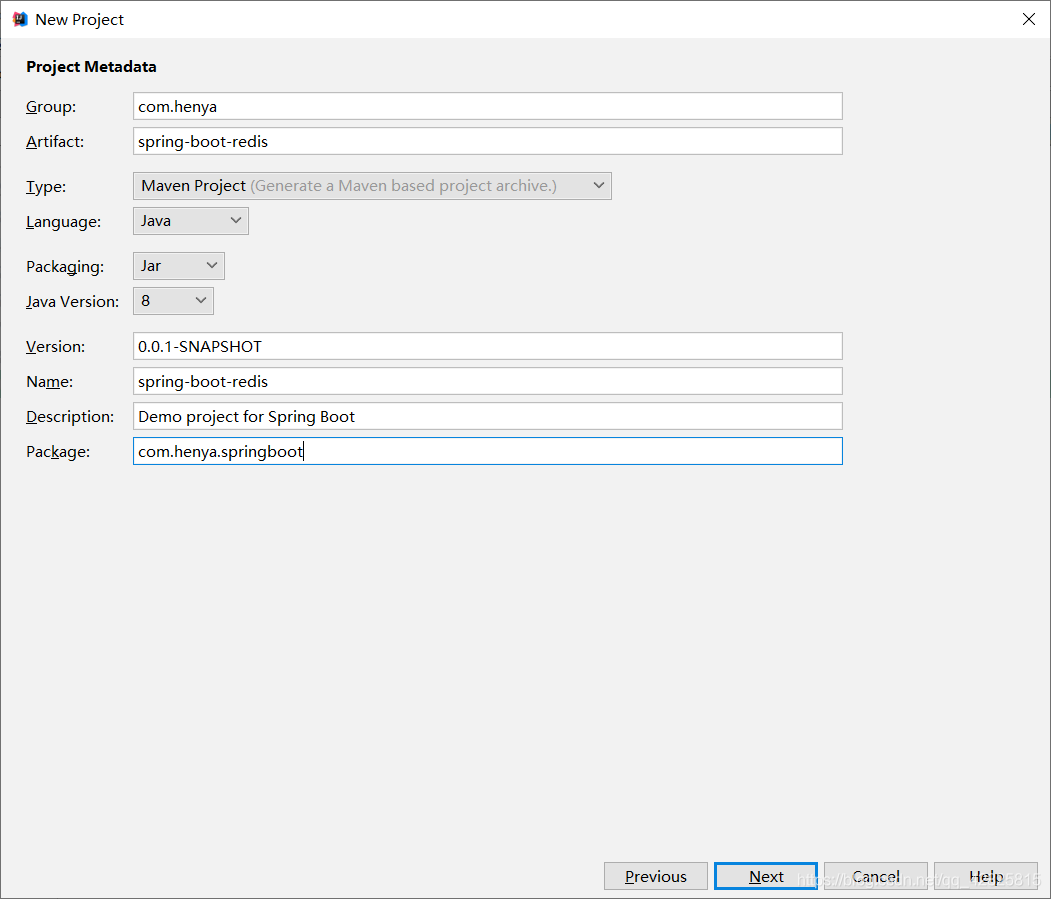
2、点击Next如图所示,命名好Group和Artifact
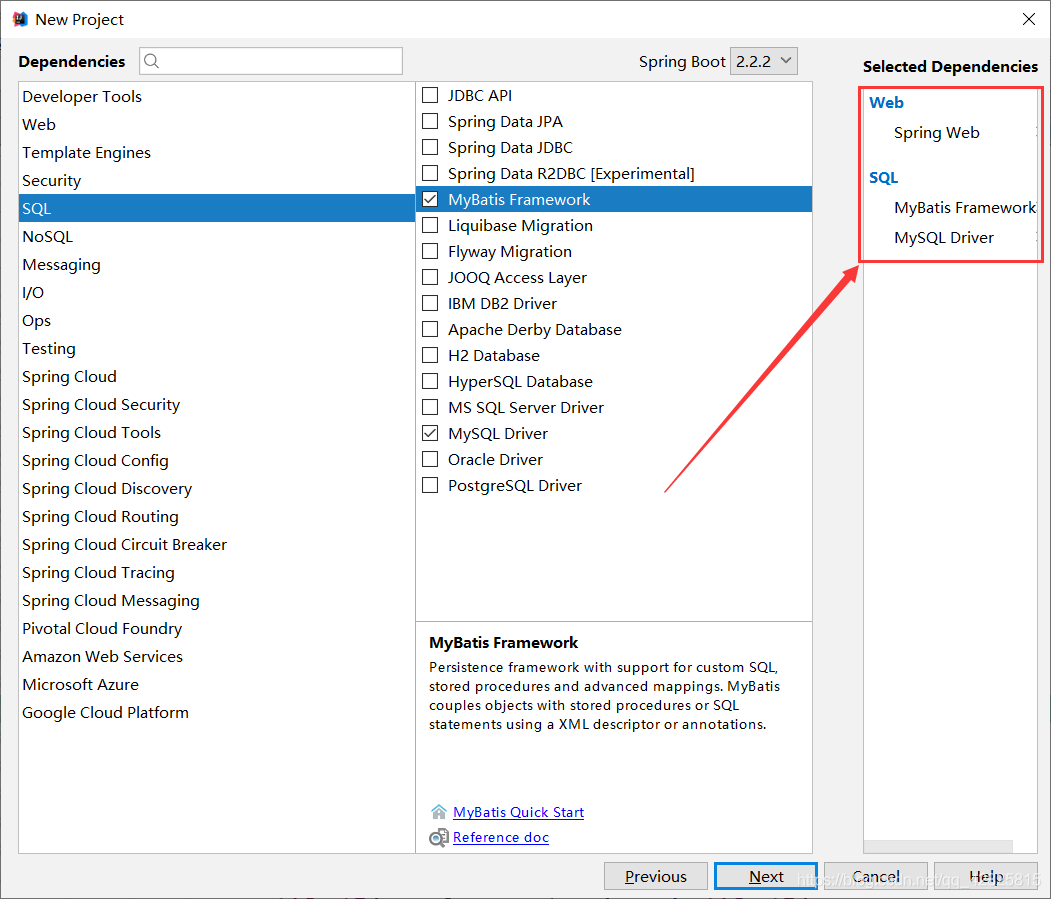
3、Next后如图所示,勾选中需要的依赖,Spring Initializr会自动导入所需的starter
4、创建项目成功后,pom.xml文件中的依赖如下
4.0.0 org.springframework.boot spring-boot-starter-parent 2.2.2.RELEASE com.heny spring-boot-redis 0.0.1-SNAPSHOT spring-boot-redis Demo project for Spring Boot 1.8 org.springframework.boot spring-boot-starter-web org.mybatis.spring.boot mybatis-spring-boot-starter 2.1.1 mysql mysql-connector-java runtime org.springframework.boot spring-boot-starter-test test org.junit.vintage junit-vintage-engine org.springframework.boot spring-boot-maven-plugin
5、在pom.xml文件中添加redis的starter
org.springframework.boot spring-boot-starter-data-redis
6、创建JavaBean用于封装数据库数据,需要实现Serializable
package com.henya.springboot.bean;

import java.io.Serializable;

public class Employee implements Serializable{

	private Integer id;
	private String lastName;
	private String email;
	private Integer gender; //性别 1男 0女
	private Integer dId;


	public Employee() {
		super();
	}


	public Employee(Integer id, String lastName, String email, Integer gender, Integer dId) {
		super();
		this.id = id;
		this.lastName = lastName;
		this.email = email;
		this.gender = gender;
		this.dId = dId;
	}

	public Integer getId() {
		return id;
	}
	public void setId(Integer id) {
		this.id = id;
	}
	public String getLastName() {
		return lastName;
	}
	public void setLastName(String lastName) {
		this.lastName = lastName;
	}
	public String getEmail() {
		return email;
	}
	public void setEmail(String email) {
		this.email = email;
	}
	public Integer getGender() {
		return gender;
	}
	public void setGender(Integer gender) {
		this.gender = gender;
	}
	public Integer getdId() {
		return dId;
	}
	public void setdId(Integer dId) {
		this.dId = dId;
	}
	@Override
	public String toString() {
		return "Employee [id=" + id + ", lastName=" + lastName + ", email=" + email + ", gender=" + gender + ", dId="
				+ dId + "]";
	}
}
注意:
在写JavaBean对象时需要实现Serializable接口否则会报以下错误:
Cannot deserialize; nested exception is org.springframework.core.serializer.support.SerializationFailedException
7、整合Mybatis操作数据库,在application.properties配置文件中配置数据源信息
#serverTimezone用于指定时区,不然会报错
spring.datasource.url=jdbc:mysql://localhost:3306/cache?serverTimezone=UTC
spring.datasource.username=root
spring.datasource.password=123456

# 开启驼峰命名法规则
mybatis.configuration.map-underscore-to-camel-case=true
#日志级别
logging.level.com.henya.springboot.mapper=debug
8、使用注解版Mybatis创建Mapper
package com.henya.springboot.mapper;


import com.henya.springboot.bean.Employee;
import org.apache.ibatis.annotations.*;

@Mapper
public interface EmployeeMapper {

 @Select("SELECT * FROM employee WHERE id=#{id}")
 public Employee getEmpById(Integer id);

 @Update("UPDATE employee SET lastName=#{lastName},email=#{email},gender=#{gender},d_id=#{dId} WHERE id=#{id}")
 public void updateEmp(Employee employee);

 @Delete("DELETE FROM emlpoyee WHERE id=#{id}")
 public void delEmpById(Integer id);

 @Insert("INSERT INTO employee(lastName, email, gender, d_id) VALUES (#{lastName}, #{email}, #{gender}, #{dId})")
 public Employee insertEmp(Employee employee);

 @Select("SELECT * FROM employee WHERE lastName=#{lastName}")
 public Employee getEmpByLastName(String lastName);
}
注意:
需要使用使用@MapperScan注解扫描Mapper所在的接口,只需要加在主程序类上即可。除此之外,还要使用@EnableCaching用于开启缓存。
@MapperScan("com.henya.springboot.mapper")
@SpringBootApplication
@EnableCaching //开启缓存
public class SpringBootRedisApplication {

	public static void main(String[] args) {
		SpringApplication.run(SpringBootRedisApplication.class, args);
	}
}
9、编写Service类,用于访问数据库或redis缓存
package com.henya.springboot.service;
import com.henya.springboot.bean.Employee;
import com.henya.springboot.mapper.EmployeeMapper;
import org.springframework.beans.factory.annotation.Autowired;
import org.springframework.cache.annotation.*;
import org.springframework.stereotype.Service;

@CacheConfig(cacheNames = "emp") //抽取缓存的公共配置
@Service
public class EmployeeService {
 @Autowired
 EmployeeMapper employeeMapper;

 /**
 * @param id
 * @return
 */
 @Cacheable(cacheNames = {"emp"},keyGenerator = "myKeyGenerator")
 public Employee getEmpById(Integer id) {
 System.err.println("开始查询"+ id +"号员工");
 Employee employee = employeeMapper.getEmpById(id);
 return employee;
 }

 /**
 * @CachePut:既调用方法(这个方法必须要执行),又更新缓存数据
 * @param employee
 * @return
 */
 @CachePut(value = "emp",key = "#result.id")
 public Employee updateEmp(Employee employee){
 System.err.println("开始更新" + employee.getId() + "号员工");
 employeeMapper.updateEmp(employee);
 return employee;
 }

 /**
 * @CacheEvict:缓存清除
 * @param id
 */
 @CacheEvict(value = "emp",beforeInvocation = true)
 public void deleteEmp(Integer id){
 System.err.println("删除" + id + "员工");
 int i = 10/0;
 }
10、编写Controller类
package com.henya.springboot.controller;


import com.henya.springboot.bean.Employee;
import com.henya.springboot.service.EmployeeService;
import org.springframework.beans.factory.annotation.Autowired;
import org.springframework.web.bind.annotation.GetMapping;
import org.springframework.web.bind.annotation.PathVariable;
import org.springframework.web.bind.annotation.RestController;

/**
 * @Description:
 * @Author:HenYa
 * @CreatTime:2019/12/1 12:44
 */
@RestController
public class EmployeeController {
 @Autowired
 EmployeeService employeeService;

 @GetMapping("/emp/{id}")
 public Employee getEmpById(@PathVariable("id") Integer id){
 Employee employee = employeeService.getEmpById(id);
 return employee;
 }

 @GetMapping("/emp")
 public Employee updateEmp(Employee employee){
 Employee emp = employeeService.updateEmp(employee);
 return emp;
 }
}
二、测试SpringBoot整合Redis是否成功
1、在浏览器访问,也可以使用测试类,笔者使用了浏览器访问http://localhost:8080/emp/1进行测试,初次访问时,控制台会提示开始查询1号员工,如图所示。

2、再次访问时,控制台并没有sql日志,如图所示。

3、此时使用RedisDesktopManager工具查看redis时有数据,并且cacheName为emp,如图所示
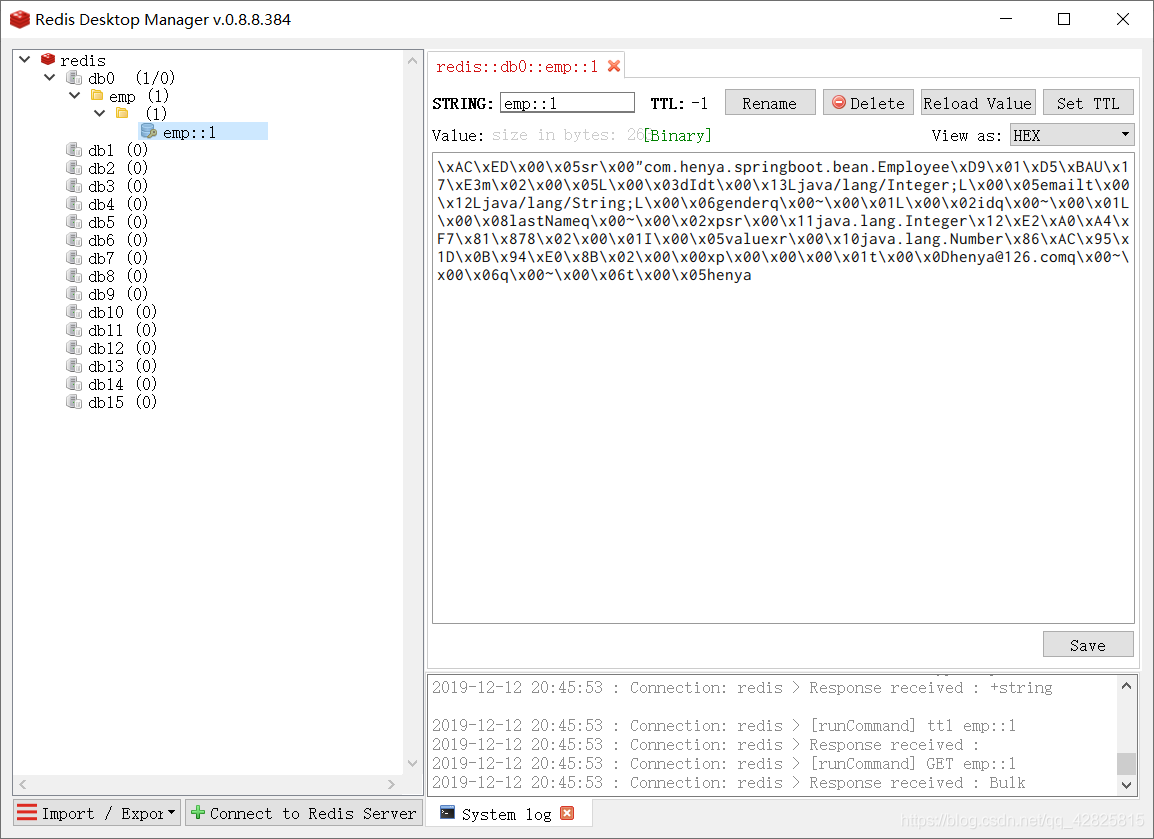
只是emp对象被序列化了。查看源码可知Redis默认使用Jdk进行序列化。
static RedisSerializer
查看RedisSerializer接口的实现有以下几种:
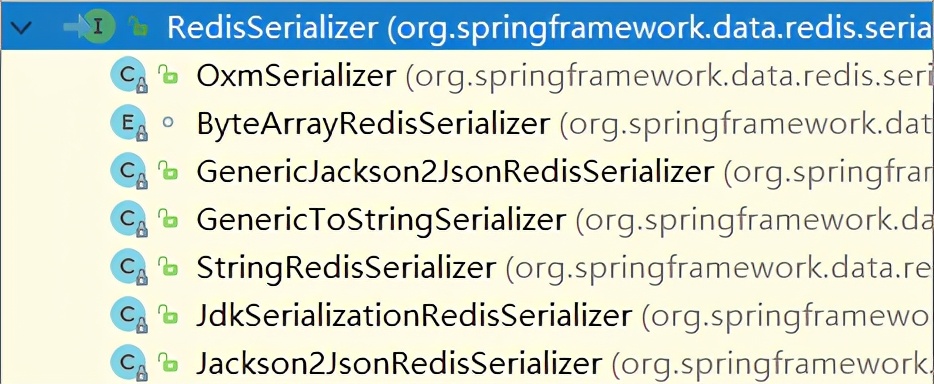
我们常用的就是以json的格式进行序列化。但是需要自定义RedisCacheManager。
三、自定义RedisCacheManager
package com.henya.springboot.config;
import org.springframework.context.annotation.Bean;
import org.springframework.context.annotation.Configuration;
import org.springframework.data.redis.cache.RedisCacheConfiguration;
import org.springframework.data.redis.cache.RedisCacheManager;
import org.springframework.data.redis.cache.RedisCacheWriter;
import org.springframework.data.redis.connection.RedisConnectionFactory;
import org.springframework.data.redis.serializer.GenericJackson2JsonRedisSerializer;
import org.springframework.data.redis.serializer.RedisSerializationContext;
import org.springframework.data.redis.serializer.RedisSerializer;
/**
* @Description:
* @Author:HenYa
* @CreatTime:2019/12/6 20:50
*/
@Configuration
public class MyRedisConfig {
@Bean
public RedisCacheManager empCacheManager(RedisConnectionFactory redisConnectionFactory){
//RedisCacheManager redisCacheManager = new RedisCacheManager(redisConnectionFactory);
RedisCacheWriter redisCacheWriter = RedisCacheWriter.nonLockingRedisCacheWriter(redisConnectionFactory);
RedisSerializer
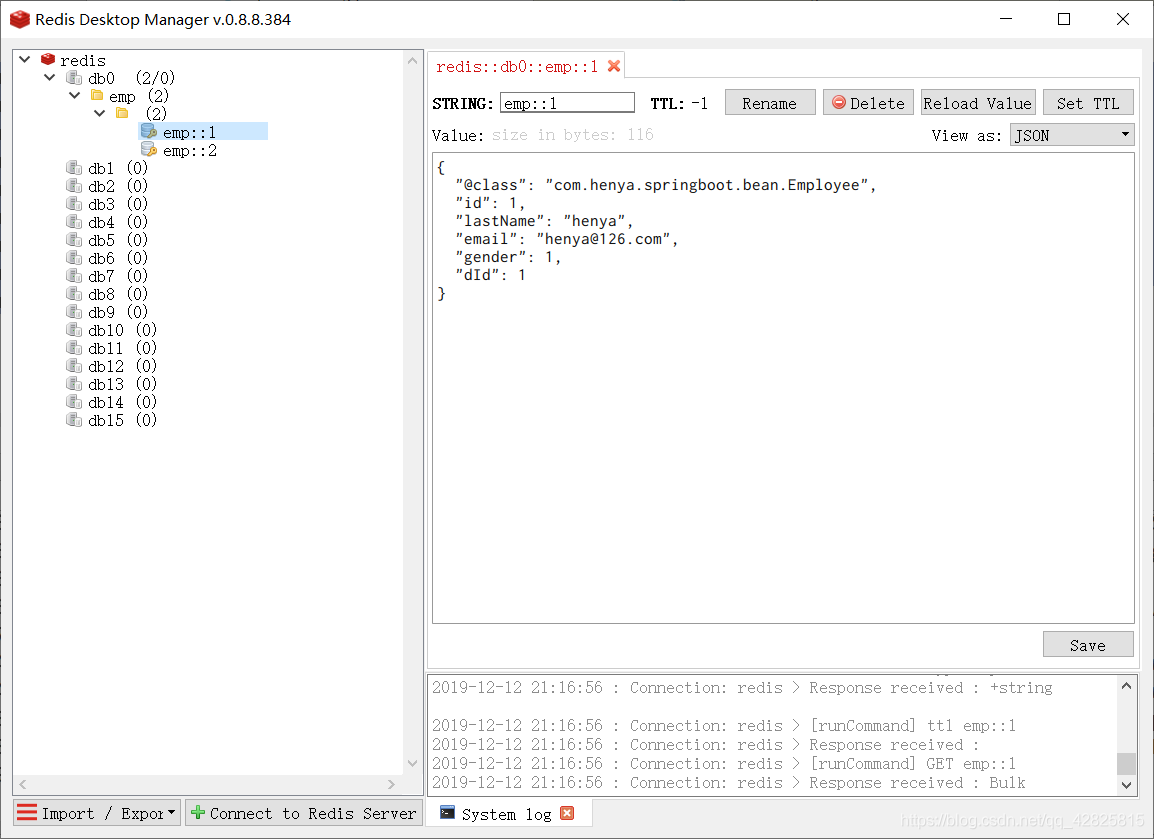
此时,Redis中缓存数据就以Json的格式进行序列化,如图所示。
今天关于《从零搭建SpringBoot2.X整合Redis框架的详细教程》的内容介绍就到此结束,如果有什么疑问或者建议,可以在golang学习网公众号下多多回复交流;文中若有不正之处,也希望回复留言以告知!
 Redis 缓存实现存储和读取历史搜索关键字的操作方法
- 上一篇
- Redis 缓存实现存储和读取历史搜索关键字的操作方法

- 下一篇
- 基于Redis位图实现系统用户登录统计
-

- 聪慧的战斗机
- 这篇博文真是及时雨啊,太细致了,写的不错,码起来,关注老哥了!希望老哥能多写数据库相关的文章。
- 2023-01-04 23:14:55
-
- 数据库 · Redis | 5天前 |
- RedisLua脚本实现复杂正则匹配方法
- 438浏览 收藏
-

- 数据库 · Redis | 5天前 |
- Redis客户端缓冲区优化技巧
- 146浏览 收藏
-
- 数据库 · Redis | 5天前 |
- RedisPSUBSCRIBE耗CPU原因解析
- 476浏览 收藏
-
- 数据库 · Redis | 5天前 |
- Redis分布式锁释放原子性保障方案
- 216浏览 收藏
-
- 数据库 · Redis | 6天前 |
- RedisLua脚本实现分布式事务补偿与回滚
- 180浏览 收藏
-

- 数据库 · Redis | 6天前 |
- Redis6.0线程优化与CPU绑定方法
- 326浏览 收藏
-

- 数据库 · Redis | 6天前 |
- Redis发布订阅支持消息压缩吗?
- 415浏览 收藏
-
- 数据库 · Redis | 6天前 |
- Redis缓存优化:调整淘汰策略提命中率
- 242浏览 收藏
-
- 数据库 · Redis | 6天前 |
- Redis集群节点负载查看技巧
- 369浏览 收藏
-
- 数据库 · Redis | 6天前 |
- Redis7.0IO多线程优化方法
- 251浏览 收藏
-
- 数据库 · Redis | 6天前 |
- Redis集群Pub/Sub如何减少广播消耗
- 451浏览 收藏
-
- 数据库 · Redis | 6天前 |
- Redis主从优化:延长repl-backlog-ttl设置
- 477浏览 收藏
-

- 前端进阶之JavaScript设计模式
- 设计模式是开发人员在软件开发过程中面临一般问题时的解决方案,代表了最佳的实践。本课程的主打内容包括JS常见设计模式以及具体应用场景,打造一站式知识长龙服务,适合有JS基础的同学学习。
- 543次学习
-

- GO语言核心编程课程
- 本课程采用真实案例,全面具体可落地,从理论到实践,一步一步将GO核心编程技术、编程思想、底层实现融会贯通,使学习者贴近时代脉搏,做IT互联网时代的弄潮儿。
- 516次学习
-

- 简单聊聊mysql8与网络通信
- 如有问题加微信:Le-studyg;在课程中,我们将首先介绍MySQL8的新特性,包括性能优化、安全增强、新数据类型等,帮助学生快速熟悉MySQL8的最新功能。接着,我们将深入解析MySQL的网络通信机制,包括协议、连接管理、数据传输等,让
- 500次学习
-
- JavaScript正则表达式基础与实战
- 在任何一门编程语言中,正则表达式,都是一项重要的知识,它提供了高效的字符串匹配与捕获机制,可以极大的简化程序设计。
- 487次学习
-

- 从零制作响应式网站—Grid布局
- 本系列教程将展示从零制作一个假想的网络科技公司官网,分为导航,轮播,关于我们,成功案例,服务流程,团队介绍,数据部分,公司动态,底部信息等内容区块。网站整体采用CSSGrid布局,支持响应式,有流畅过渡和展现动画。
- 485次学习
-
- ChatExcel酷表
- ChatExcel酷表是由北京大学团队打造的Excel聊天机器人,用自然语言操控表格,简化数据处理,告别繁琐操作,提升工作效率!适用于学生、上班族及政府人员。
- 6433次使用
-
- Any绘本
- 探索Any绘本(anypicturebook.com/zh),一款开源免费的AI绘本创作工具,基于Google Gemini与Flux AI模型,让您轻松创作个性化绘本。适用于家庭、教育、创作等多种场景,零门槛,高自由度,技术透明,本地可控。
- 6850次使用
-
- 可赞AI
- 可赞AI,AI驱动的办公可视化智能工具,助您轻松实现文本与可视化元素高效转化。无论是智能文档生成、多格式文本解析,还是一键生成专业图表、脑图、知识卡片,可赞AI都能让信息处理更清晰高效。覆盖数据汇报、会议纪要、内容营销等全场景,大幅提升办公效率,降低专业门槛,是您提升工作效率的得力助手。
- 6641次使用
-
- 星月写作
- 星月写作是国内首款聚焦中文网络小说创作的AI辅助工具,解决网文作者从构思到变现的全流程痛点。AI扫榜、专属模板、全链路适配,助力新人快速上手,资深作者效率倍增。
- 8594次使用
-

- MagicLight
- MagicLight.ai是全球首款叙事驱动型AI动画视频创作平台,专注于解决从故事想法到完整动画的全流程痛点。它通过自研AI模型,保障角色、风格、场景高度一致性,让零动画经验者也能高效产出专业级叙事内容。广泛适用于独立创作者、动画工作室、教育机构及企业营销,助您轻松实现创意落地与商业化。
- 7282次使用
-
- redis复制有可能碰到的问题汇总
- 2023-01-01 501浏览
-
- 使用lua+redis解决发多张券的并发问题
- 2023-01-27 501浏览
-
- Redis应用实例分享:社交媒体平台设计
- 2023-06-21 501浏览
-
- 使用Python和Redis构建日志分析系统:如何实时监控系统运行状况
- 2023-08-08 501浏览
-
- 如何利用Redis和Python实现消息队列功能
- 2023-08-16 501浏览