基于Python怎么实现人机对战五子棋游戏
来源:亿速云
2024-04-21 18:39:35
0浏览
收藏
从现在开始,我们要努力学习啦!今天我给大家带来《基于Python怎么实现人机对战五子棋游戏》,感兴趣的朋友请继续看下去吧!下文中的内容我们主要会涉及到等等知识点,如果在阅读本文过程中有遇到不清楚的地方,欢迎留言呀!我们一起讨论,一起学习!
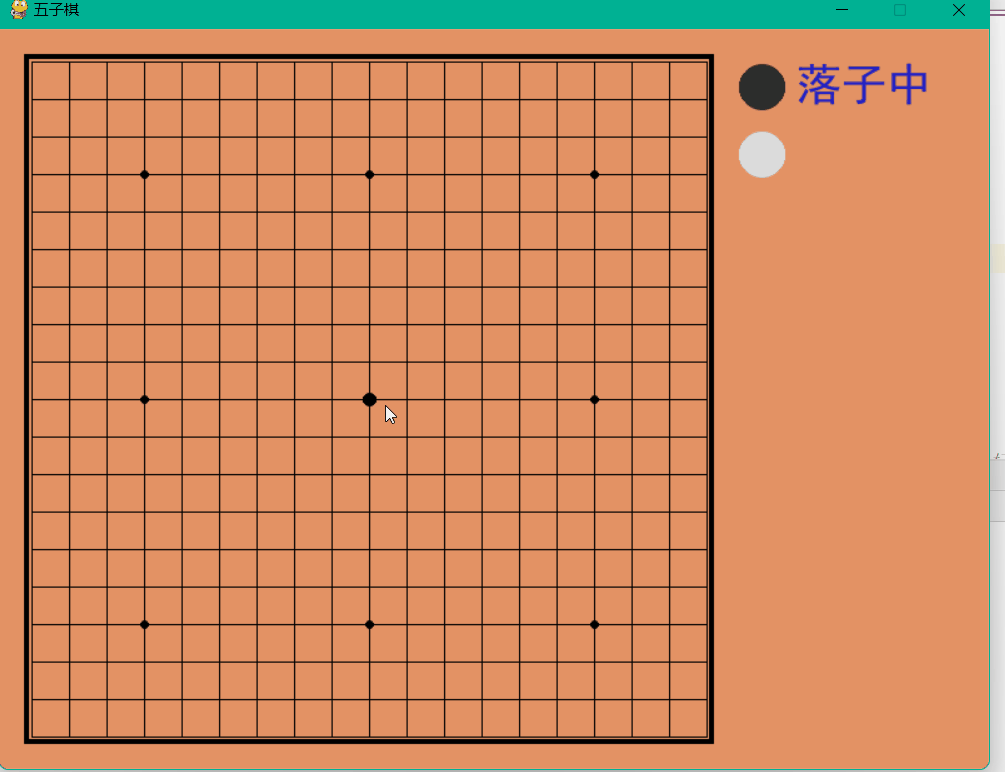
人人对战
游戏规则:p1为黑子,p2为白子,黑子先手,一方达到五子相连即为获胜。
动态演示
源码分享
cheackboard.py
定义黑白子,落子位置以及获胜规则。
from collections import namedtuple

Chessman = namedtuple('Chessman', 'Name Value Color')
Point = namedtuple('Point', 'X Y')

BLACK_CHESSMAN = Chessman('黑子', 1, (45, 45, 45))
WHITE_CHESSMAN = Chessman('白子', 2, (219, 219, 219))

offset = [(1, 0), (0, 1), (1, 1), (1, -1)]


class Checkerboard:
    def __init__(self, line_points):
        self._line_points = line_points
        self._checkerboard = [[0] * line_points for _ in range(line_points)]

    def _get_checkerboard(self):
        return self._checkerboard

    checkerboard = property(_get_checkerboard)

    # 判断是否可落子
    def can_drop(self, point):
        return self._checkerboard[point.Y][point.X] == 0

    def drop(self, chessman, point):
        """
        落子
        :param chessman:
        :param point:落子位置
        :return:若该子落下之后即可获胜,则返回获胜方,否则返回 None
        """
        print(f'{chessman.Name} ({point.X}, {point.Y})')
        self._checkerboard[point.Y][point.X] = chessman.Value

        if self._win(point):
            print(f'{chessman.Name}获胜')
            return chessman

    # 判断是否赢了
    def _win(self, point):
        cur_value = self._checkerboard[point.Y][point.X]
        for os in offset:
            if self._get_count_on_direction(point, cur_value, os[0], os[1]):
                return True

    def _get_count_on_direction(self, point, value, x_offset, y_offset):
        count = 1
        for step in range(1, 5):
            x = point.X + step * x_offset
            y = point.Y + step * y_offset
            if 0 <= x < self._line_points and 0 <= y < self._line_points and self._checkerboard[y][x] == value:
                count += 1
            else:
                break
        for step in range(1, 5):
            x = point.X - step * x_offset
            y = point.Y - step * y_offset
            if 0 <= x < self._line_points and 0 <= y < self._line_points and self._checkerboard[y][x] == value:
                count += 1
            else:
                break

        return count >= 5
人人对战.py
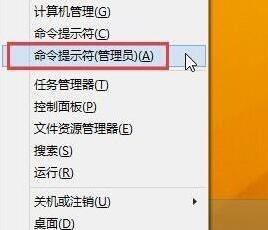
导入模块
如出现模块的错误,在pycharm终端输入如下指令。
pip install 相应模块 -i https://pypi.douban.com/simple
import sys
import pygame
from pygame.locals import *
import pygame.gfxdraw
from 小游戏.五子棋.checkerboard import Checkerboard, BLACK_CHESSMAN, WHITE_CHESSMAN, Point
设置棋盘和棋子参数
SIZE = 30  # 棋盘每个点时间的间隔
Line_Points = 19  # 棋盘每行/每列点数
Outer_Width = 20  # 棋盘外宽度
Border_Width = 4  # 边框宽度
Inside_Width = 4  # 边框跟实际的棋盘之间的间隔
Border_Length = SIZE * (Line_Points - 1) + Inside_Width * 2 + Border_Width  # 边框线的长度
Start_X = Start_Y = Outer_Width + int(Border_Width / 2) + Inside_Width  # 网格线起点(左上角)坐标
SCREEN_HEIGHT = SIZE * (Line_Points - 1) + Outer_Width * 2 + Border_Width + Inside_Width * 2  # 游戏屏幕的高
SCREEN_WIDTH = SCREEN_HEIGHT + 200  # 游戏屏幕的宽

Stone_Radius = SIZE // 2 - 3  # 棋子半径
Stone_Radius2 = SIZE // 2 + 3
Checkerboard_Color = (0xE3, 0x92, 0x65)  # 棋盘颜色
BLACK_COLOR = (0, 0, 0)
WHITE_COLOR = (255, 255, 255)
RED_COLOR = (200, 30, 30)
BLUE_COLOR = (30, 30, 200)

RIGHT_INFO_POS_X = SCREEN_HEIGHT + Stone_Radius2 * 2 + 10
局内字体设置
def print_text(screen, font, x, y, text, fcolor=(255, 255, 255)):
    imgText = font.render(text, True, fcolor)
    screen.blit(imgText, (x, y))


def main():
    pygame.init()
    screen = pygame.display.set_mode((SCREEN_WIDTH, SCREEN_HEIGHT))
    pygame.display.set_caption('五子棋')

    font1 = pygame.font.SysFont('SimHei', 32)
    font2 = pygame.font.SysFont('SimHei', 72)
    fwidth, fheight = font2.size('黑方获胜')

    checkerboard = Checkerboard(Line_Points)
    cur_runner = BLACK_CHESSMAN
    winner = None
    computer = AI(Line_Points, WHITE_CHESSMAN)

    black_win_count = 0
    white_win_count = 0
落子循坏体
    while True:
        for event in pygame.event.get():
            if event.type == QUIT:
                sys.exit()
            elif event.type == KEYDOWN:
                if event.key == K_RETURN:
                    if winner is not None:
                        winner = None
                        cur_runner = BLACK_CHESSMAN
                        checkerboard = Checkerboard(Line_Points)
                        computer = AI(Line_Points, WHITE_CHESSMAN)
            elif event.type == MOUSEBUTTONDOWN:
                if winner is None:
                    pressed_array = pygame.mouse.get_pressed()
                    if pressed_array[0]:
                        mouse_pos = pygame.mouse.get_pos()
                        click_point = _get_clickpoint(mouse_pos)
                        if click_point is not None:
                            if checkerboard.can_drop(click_point):
                                winner = checkerboard.drop(cur_runner, click_point)
                                if winner is None:
                                    cur_runner = _get_next(cur_runner)
                                    computer.get_opponent_drop(click_point)
                                    AI_point = computer.AI_drop()
                                    winner = checkerboard.drop(cur_runner, AI_point)
                                    if winner is not None:
                                        white_win_count += 1
                                    cur_runner = _get_next(cur_runner)
                                else:
                                    black_win_count += 1
                        else:
                            print('超出棋盘区域')
画棋盘
def _draw_checkerboard(screen):
    # 填充棋盘背景色
    screen.fill(Checkerboard_Color)
    # 画棋盘网格线外的边框
    pygame.draw.rect(screen, BLACK_COLOR, (Outer_Width, Outer_Width, Border_Length, Border_Length), Border_Width)
    # 画网格线
    for i in range(Line_Points):
        pygame.draw.line(screen, BLACK_COLOR,
                         (Start_Y, Start_Y + SIZE * i),
                         (Start_Y + SIZE * (Line_Points - 1), Start_Y + SIZE * i),
                         1)
    for j in range(Line_Points):
        pygame.draw.line(screen, BLACK_COLOR,
                         (Start_X + SIZE * j, Start_X),
                         (Start_X + SIZE * j, Start_X + SIZE * (Line_Points - 1)),
                         1)
    # 画星位和天元
    for i in (3, 9, 15):
        for j in (3, 9, 15):
            if i == j == 9:
                radius = 5
            else:
                radius = 3
            # pygame.draw.circle(screen, BLACK, (Start_X + SIZE * i, Start_Y + SIZE * j), radius)
            pygame.gfxdraw.aacircle(screen, Start_X + SIZE * i, Start_Y + SIZE * j, radius, BLACK_COLOR)
            pygame.gfxdraw.filled_circle(screen, Start_X + SIZE * i, Start_Y + SIZE * j, radius, BLACK_COLOR)
运行框返回落子坐标
def _get_clickpoint(click_pos):
    pos_x = click_pos[0] - Start_X
    pos_y = click_pos[1] - Start_Y
    if pos_x < -Inside_Width or pos_y < -Inside_Width:
        return None
    x = pos_x // SIZE
    y = pos_y // SIZE
    if pos_x % SIZE > Stone_Radius:
        x += 1
    if pos_y % SIZE > Stone_Radius:
        y += 1
    if x >= Line_Points or y >= Line_Points:
        return None

    return Point(x, y)
执行文件
if __name__ == '__main__':
    main()
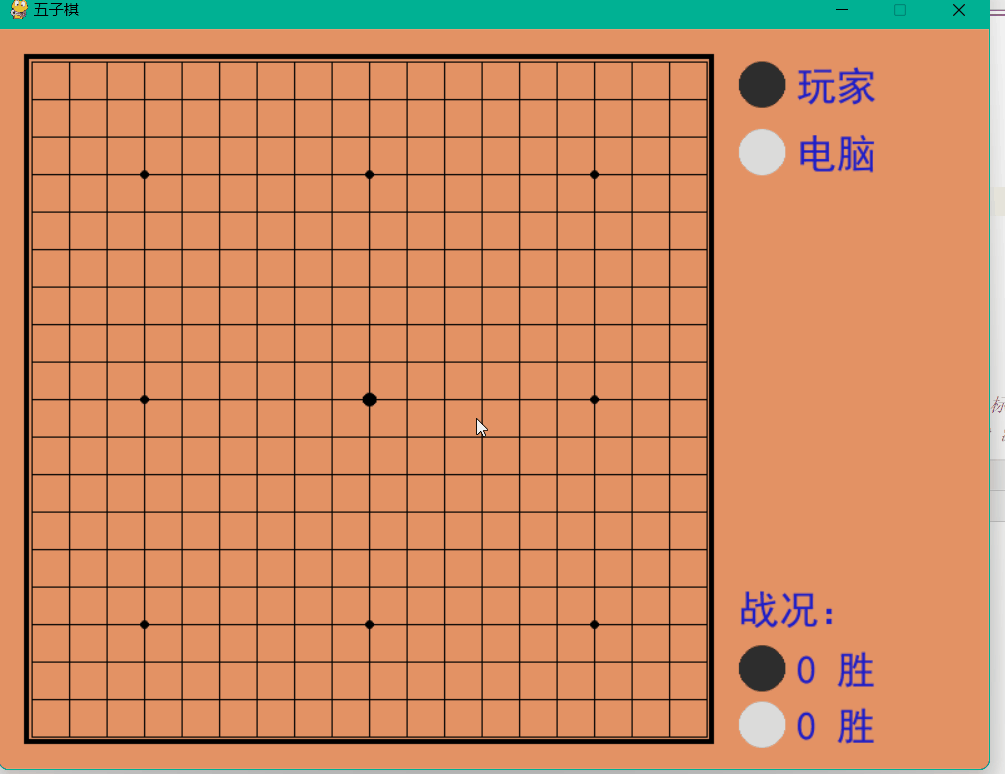
人机对战
动态演示
终于介绍完啦!小伙伴们,这篇关于《基于Python怎么实现人机对战五子棋游戏》的介绍应该让你收获多多了吧!欢迎大家收藏或分享给更多需要学习的朋友吧~golang学习网公众号也会发布文章相关知识,快来关注吧!
版本声明
本文转载于:亿速云 如有侵犯,请联系study_golang@163.com删除
 对AWS lambda函数的curl请求没有收到json
- 上一篇
- 对AWS lambda函数的curl请求没有收到json
- 下一篇
- WIN8浏览器加载flash失败的处理方法
查看更多
最新文章
-

- 文章 · python教程 | 13小时前 | Python版本 查看Python版本
- 激活虚拟环境后查看Python版本的技巧
- 204浏览 收藏
-

- 文章 · python教程 | 14小时前 |
- Python 3.11 ExceptionGroup处理异常方法
- 352浏览 收藏
-

- 文章 · python教程 | 14小时前 |
- Pandas逐行线性回归与斜率提取方法
- 224浏览 收藏
-
- 文章 · python教程 | 14小时前 | Python 文件路径
- Python如何判断路径是文件或文件夹
- 445浏览 收藏
-
- 文章 · python教程 | 14小时前 |
- Python图片转Base64方法详解
- 488浏览 收藏
-
- 文章 · python教程 | 14小时前 |
- Python glob模块使用详解
- 382浏览 收藏
-

- 文章 · python教程 | 15小时前 |
- Python连接Spark方法,PySpark配置教程
- 494浏览 收藏
-

- 文章 · python教程 | 15小时前 |
- Python可选参数默认值设置技巧
- 473浏览 收藏
-
- 文章 · python教程 | 15小时前 |
- 修复Python浮点误差,用decimal实现高精度计算
- 170浏览 收藏
-
- 文章 · python教程 | 15小时前 |
- Python 3.8+ 使用XPath 2.0方法详解
- 498浏览 收藏
-

- 文章 · python教程 | 15小时前 |
- PyTorch多进程死锁解决方法
- 304浏览 收藏
-

- 文章 · python教程 | 16小时前 |
- Python 网络重试机制怎么实现?
- 417浏览 收藏

查看更多
课程推荐
-

- 前端进阶之JavaScript设计模式
- 设计模式是开发人员在软件开发过程中面临一般问题时的解决方案,代表了最佳的实践。本课程的主打内容包括JS常见设计模式以及具体应用场景,打造一站式知识长龙服务,适合有JS基础的同学学习。
- 543次学习
-

- GO语言核心编程课程
- 本课程采用真实案例,全面具体可落地,从理论到实践,一步一步将GO核心编程技术、编程思想、底层实现融会贯通,使学习者贴近时代脉搏,做IT互联网时代的弄潮儿。
- 516次学习
-

- 简单聊聊mysql8与网络通信
- 如有问题加微信:Le-studyg;在课程中,我们将首先介绍MySQL8的新特性,包括性能优化、安全增强、新数据类型等,帮助学生快速熟悉MySQL8的最新功能。接着,我们将深入解析MySQL的网络通信机制,包括协议、连接管理、数据传输等,让
- 500次学习
-
- JavaScript正则表达式基础与实战
- 在任何一门编程语言中,正则表达式,都是一项重要的知识,它提供了高效的字符串匹配与捕获机制,可以极大的简化程序设计。
- 487次学习
-

- 从零制作响应式网站—Grid布局
- 本系列教程将展示从零制作一个假想的网络科技公司官网,分为导航,轮播,关于我们,成功案例,服务流程,团队介绍,数据部分,公司动态,底部信息等内容区块。网站整体采用CSSGrid布局,支持响应式,有流畅过渡和展现动画。
- 485次学习
查看更多
AI推荐
-

- ChatExcel酷表
- ChatExcel酷表是由北京大学团队打造的Excel聊天机器人,用自然语言操控表格,简化数据处理,告别繁琐操作,提升工作效率!适用于学生、上班族及政府人员。
- 4575次使用
-

- Any绘本
- 探索Any绘本(anypicturebook.com/zh),一款开源免费的AI绘本创作工具,基于Google Gemini与Flux AI模型,让您轻松创作个性化绘本。适用于家庭、教育、创作等多种场景,零门槛,高自由度,技术透明,本地可控。
- 4936次使用
-

- 可赞AI
- 可赞AI,AI驱动的办公可视化智能工具,助您轻松实现文本与可视化元素高效转化。无论是智能文档生成、多格式文本解析,还是一键生成专业图表、脑图、知识卡片,可赞AI都能让信息处理更清晰高效。覆盖数据汇报、会议纪要、内容营销等全场景,大幅提升办公效率,降低专业门槛,是您提升工作效率的得力助手。
- 4800次使用
-
- 星月写作
- 星月写作是国内首款聚焦中文网络小说创作的AI辅助工具,解决网文作者从构思到变现的全流程痛点。AI扫榜、专属模板、全链路适配,助力新人快速上手,资深作者效率倍增。
- 6697次使用
-

- MagicLight
- MagicLight.ai是全球首款叙事驱动型AI动画视频创作平台,专注于解决从故事想法到完整动画的全流程痛点。它通过自研AI模型,保障角色、风格、场景高度一致性,让零动画经验者也能高效产出专业级叙事内容。广泛适用于独立创作者、动画工作室、教育机构及企业营销,助您轻松实现创意落地与商业化。
- 5163次使用
查看更多
相关文章
-
- Flask框架安装技巧:让你的开发更高效
- 2024-01-03 501浏览
-
- Django框架中的并发处理技巧
- 2024-01-22 501浏览
-
- 提升Python包下载速度的方法——正确配置pip的国内源
- 2024-01-17 501浏览
-
- Python与C++:哪个编程语言更适合初学者?
- 2024-03-25 501浏览
-
- 品牌建设技巧
- 2024-04-06 501浏览